7.1. 소개
이 장에서 5장과 6장의 예제를 야후 날씨 피드로부터 데이터를 읽는 간단한 웹 어플리케이션과 명령행 유틸리티로 만들기 위해 Spring 프레임워크와 Hibernate를 사용하는 프로젝트로 발전시키는 다중 모듈 프로젝트를 생성한다. 4장에서 만든 simple-weather 코드는 5장에서 정의된 simple-webapp 프로젝트로 합해진다. 이러한 다중 모듈 프로젝트를 생성하는 과정에서 메이븐을 살펴보고 재사용을 위한 모듈 프로젝트를 생성하는데 사용될 수 있는 서로 다른 방법을 설명할 것이다.
이 예제에서 만든 다중 모듈 프로젝트는 4장과 5장에서 만든 프로젝트의 수정된 버전으로 구성되며, 이 다중 모듈 프로젝트를 생성하기 위해 Maven Archetype 플러그인을 사용하지 않는다. 이 장의 내용을 읽는 동안 보충 자료로 사용하는 예제 코드의 복사본을 다운로드받는 것을 강력히 권한다. 예제없이 이 장의 예제 코드를 재생성할 수 없을 것이다. 이 장의 에제 프로젝트는 http://www.sonatype.com/book/mvn-examples-1.0.zip 나 http://www.sonatype.com/book/mvn-examples-1.0.tar.gz의 책의 예제 코드와 같이 다운로드받을 수 있다. 디렉토리에 이 파일을 압축을 풀고, 이 장에서 만들 다중 모듈 메이븐 프로젝트로 이동하라. simple-parent/ 프로젝트 디렉토리에서 pom.xml 와 5개의 하위 모듈 디렉토리인 simple-model/, simple-persist/, simple-command/, simple-weather/, simple-webapp/ 를 볼 수 있을 것이다. 웹 브라우저에서 예제코드를 보기 원한다면, http://www.sonatype.com/book/examples-1.0 로 이동해서, ch07/ 디렉토리를 클릭하라.
대형 엔터프라이즈 수준의 프로젝트에 대한 복잡성을 제시하는 것은 이 책의 범위를 훨씬 넘어서는 것이다. 그러한 프로젝트들은 다중 DB와, 외부 시스템과의 통합, 부서로 구획화되는 하위 프로젝트들로 규정된다. 이러한 프로젝트들은 통상 수천 라인의 코드로 구성되며 수십 혹은 수백명의 개발자 공수와 관련된다. 그러한 완전한 예제가 이 책의 범위 밖의 것이라도, 대형 엔터프라이즈 어플리케이션의 복잡성을 제시하는 동일한 프로젝트를 제공할 수 있다. 결론적으로, 이 장에서 설명된 것 이상의 모듈화에 대한 어떤 가능성을 제시한다.
이 장에서 두개의 어플리케이션인 야후 날시 피드에 대한 명령행 질의 도구와, 야후 날씨 피드를 검색하는 웹 어플리케이션을 만드는 다중 모듈 메이븐 프로젝트를 살펴볼 것이다. 이 두개의 어플리케이션은 내장된 DB에 질의 결과를 저장한다. 각각은 사용자가 내장된 DB로부터 이전 날시 데이터를 조회하는 것을 가능하게 한다. 두개의 어플리케이션은 어플리케이션 로직을 재사용하며 저장 라이브러리를 공유한다. 이 장의 예제는 4장에서 소개한 야후 날씨 파싱 코드에 대해 빌드한다. 이 프로젝트는 그림 7-1에 나타난 바와 같이 5개의 하위 모듈로 나뉜다.
이 장은 책에서 소개하기에 간단한 고안된 예제를 포함하지만, 5개의 하위모듈을 정의하는데는 충분히 복잡하다. 고안된 예제는 5개의 클래스와 두개의 서비스 클래스를 가진 저장 라이브러리, 5~6개의 클래스를 갖는 날씨 파싱 라이브러리를 가지는 모델 프로젝트를 포함하지만, 실제 세계의 시스템은 수백개의 객체와, 수십개의 저장 라이브러리들, 여러 부서로 확장된 서비스 라이브러리들을 포함하는 모델 프로젝트를 가질 수도 있다. 이 예제에서 포함된 코드는 짧은 시간 동안 이해하는데 충분히 직관적이라고 인정하지만, 일부러 모듈화 프로젝트에 대한 빌드를 수행했다. 이 장의 예제를 살펴보려고 하고 현재의 모델 프로젝트가 단지 5개의 클래스만을 가지고 있다는 사실에 Maven이 너무나도 복잡한 것을 조성한다는 생각을 쉽게 생각할 수도 있다. Maven 사용이 특정 수준의 모듈화를 제시하고 있지만, Maven의 다중 모듈 기능을 소개하려는 목적으로 단순한 예제 프로젝트를 고의로 복잡하게 구성했음을 이해하라.
이 장의 예제는 유명하지만 메이븐과 직접적으로 관계가 없는 몇가지 기술과 관련된다. 이러한 기술들에는 Spring 프레임워크와 Hibernate가 있다. Spring 프레임워크는 제어 역행(IoC) 컨테이너로 다양한 J2EE 라이브러리와의 상호작용을 단순화시키려는 목적을 가진 여러 프레임워크로 구성된다. 어플리케이션 개발에 기반 프레임워크로 Spring 프레임워크를 사용한다는 것은 Hibernate나 iBATIS와 같은 저장 프레임워크나 혹은 JDBC, JNDI, JMS와 같은 엔터프라이즈 API를 사용해서 처리하는 업무에 대한 여러 업무 처리를 수행할 수 있는 수많은 도움이 되는 추상화에 대한 접근을 제공하는 것이다. Spring 프레임워크는 Sun Microsystems의 중량 엔터프라이즈 표준에 대한 대체로 과거 수년 동안 인기를 누리고 있다. Hibernate는 관계형 DB를 자바 객체의 집합체로 보면서 상호작용을 가능하게 하는 널리 사용되는 OR 매핑 프레임워크이다. 이 예제는 어플리케이션에 대해 재사용 가능한 컴포넌트를 노출시키는 Spring 프레임워크를 사용하고 내장 DB에 날씨 데이터를 저장하는데 Hibernate를 사용하는 간단한 웹 어플리케이션과 명령행 어플리케이션 구축에 초점을 둔다.
Maven을 사용할 때 이러한 기술을 사용하여 프로젝트를 어떻게 구성할지를 설명하기 위해 이러한 프레임워크에 대한 참고를 추가하기로 결정했다. 이 장으로 통해 이러한 기술들을 간략하게 소개하고는 있지만, 이러한 기술에 대한 전체적인 설명을 하지는 않을 것이다. Spring 프레임워크에 대한 더 많은 정보는 프로젝트의 웹 사이트인 http://www.springframework.org/ 를 참고하라. Hibernate와 Hibernate 어노테이션에 대한 더 많은 정보에 대해서는 프로젝트의 웹 사이트인 http://www.hibernate.org 를 참고하라. 이 장은 내장 DB로 HSQLDB (Hyper-threaded Structured Query Language Database)를 사용하며, 이 DB에 대한 더 많은 정보는 웹 사이트인 http://hsqldb.org/ 를 참고하라.
7.2. 간단한 부모 프로젝트
simple-parent 프로젝트는 5개의 하위 모듈인 simple-command, simple-model, simple-weather, simple-persist, simple-webapp를 참조하는 pom.xml 를 가진다. 최상위 pom.xml 은 예제 7-1에 나타난다.
위의 부모 POM와 예제 6-1에서 정의한 부모 POM 간의 유사성에 유의하라. 이 두개의 POM 간의 유일한 차이는 하위모듈 목록이다. 이전 예제가 단지 2개의 하위 모듈을 가진 반면에, 위의 부모 POM은 5개의 하위모듈을 가지고 있다. 다음의 절에서는 이들 각각 5개의 하위 모듈에 대해 자세하게 다룰 것이다. 예제에서 자바 어노테이션을 사용하고 있기 때문에 컴파일러의 target을 Java 5 JVM으로 설정했다.
7.3. 간단한 모델 모듈
대부분의 엔터프라이즈 프로젝트가 필요로 하는 첫번째 것은 객체 모델이다. 객체 모델은 어떠한 시스템에서든지 핵심 도메인 객체를 담고 있다. 은행 시스템은 Account, Customer, Transaction 로 구성되는 객체 모델을 가질 것이며, 혹은 스포츠 점수를 담고 상호작용하는 시스템은 Team과 Game 객체를 가질 것이다. 어떠한 것이든, 객체 모델에 해당 시스템에 개념을 모델링하는 좋은 기회가 있다. Maven에서 이러한 프로젝트를 널리 참조되는 별도의 프로젝트로 분리하는 것이 보편적인 기법이다. 이 예제 시스템에서 4개의 다른 객체들을 참조하는 Weather 객체를 가진 야후 날씨 피드에 대한 각각의 질의를 담게된다. 풍향, 체감온도, 풍속이 Wind객체에 저장된다. 우편번호, 도시, 지역, 국가를 포함하는 위치 데이터가 Location 클래스에 저장된다. 습도, 최대 가시거리, 기압, 기압의 높고 낮음의 여부와 같은 대기 조건이 Atmosphere 클래스에 저장된다. 조건에 대한 문자 기술, 온도, 관측자의 데이터가 Condition 클래스에 저장된다. 그림 7-2를 참고하라.
이 간단한 객체 모델에 대한 pom.xml 파일은 어떤 설명을 포함하는 하나의 의존관계를 포함한다. 객체 모델은 Hibernate 어노테이션을 가지고 주해된다. 이러한 어노테이션을 해당 모델을 관계형 DB의 테이블로 매핑하는데 사용한다. 의존관계는 org.hibernate:hibernate-annotations:3.3.0.ga 이다. 예제 7-2에 나타난 pom.xml 을 살펴보고, 이러한 어노테이션에 대해 몇가지 예로 다음 예제들을 볼 수 있을 것이다.
Weather 클래스에서 simple-persist 프로젝트에 대한 가이드를 제공하는 Hibernate 어노테이션을 사용하고 있다. 이러한 어노테이션들은 객체를 관계형 DB의 테이블로 매핑하는데 Hibernate에 의해 사용된다. Hibernate 어노테이션에 대해 전체적으로 설명하는 것은 이 장의 범위를 넘어서는 것이지만, 여기에 간략하게 설명을 하겠다. @Entity 어노테이션은 해당 클래스를 저장 엔티티로 지정한다. 해당 클래스에 대해 @Table 어노테이션을 생략했는데, Hibernate는 클래스의 이름을 테이블의 이름으로 Weather 을 매핑하는데 사용한다. @NamedQueries 어노테이션은 simple-persist의 WeatherDAO가 사용하는 질의를 정의한다. @NamedQuery 어노테이션의 질의 언어는 HQL (Hibernate Query Language)라고 하는 것으로 작성된다. 각각의 멤버 변수는 컬럼 유형과 해당 컬럼에 의해 의미하는 관계로 정의되는 어노테이션으로 표시된다.
다음은 예제 7-4에 나타난 두번째 모델 객체들 중의 하나인 Condition 에 대해서 살펴보자. 이 클래스 역시 src/main/java/org/sonatype/mavenbook/weather/model에 위치한다.
Condition 클래스는 Weather 클래스와 유사하다. @Entity 어노테이션으로 표기되며, id 속성에 대해 유사한 어노테이션을 가진다. text, code, temp, date 속성은 모두 기본 컬럼 세팅으로 표기되며, weather 속성은 @OneToOne 어노테이션과 weather_id라는 이름의 FK 컬럼을 가지는 관련 Weather 객체를 참조하는 또 다른 어노테이션으로 표기된다.
7.4. 간단한 날씨 모듈
다음에 설명하려는 모듈은 “서비스”라는 것으로 생각할 수 있다. Simple Weather 모듈은 야후 날씨 RSS 피드로부터 데이터를 읽고 파싱하는데 필요한 모든 로직을 담는 모듈이다. Simple Weather가 세개의 자바 클래스와 하나의 JUnit 테스트를 포함하고 있지만, Simple Web Application과 Simple Command-line Utility 모두에게 단일 컴포넌트인 WeatherService 로 표현될 것이다. 매우 종종 엔터프라이즈 프로젝트는 중요한 비즈니스 로직이나 외부 시스템과 연계되는 로직을 포함하는 몇몇 API 모듈을 포함하게 된다. 은행 시스템은 외부 데이터 제공자로부터 데이터를 읽어서 파싱하는 모듈을 가질 수 있으며, 스포츠 점수를 보여주는 시스템은 농구나 축구에 대한 실시간 점수를 제공하는 XML 피드와 상호작용할 수도 있다. 예제 7-5에서 이 모듈은 야후 날씨와 상호작용에 관련된 네트워크 작업과 XML 파싱의 모든 것을 감추게 된다. 다른 모듈들은 이 모듈에 대해 의존관계를 가지며 인자로 우편번호를 넘기고 Weather 객체를 반환하는 WeatherService의 retrieveForecast() 메소드를 단순히 호출한다.
simple-weather POM은 simple-parent POM을 상속받고 있으며, jar로 패키징하도록 세팅되며, 다음과 같은 의존관계가 추가된다.
왜 Spring에 대해 의존관계가 있는가? Hibernate 통합에 대해서 생각해볼 때 Spring은 HibernateDaoSupport 와 같은 헬퍼 클래스들을 제공한다. HibernateDaoSupport에서 제공하는 것에 대한 예제로 예제 7-9의 WeatherDAO에 대한 핵심 부분을 살펴보자.
이상과 같다. 아니다. 실제적으로 새로운 행을 입력하고, PK로 조회하고, Location 테이블의 id와 조인하는 Weather의 모든 행을 검색하는 클래스를 작성해야 한다. 명확하게 Hibernate의 복잡함에 대해 이해시키기 위해서는 이 책에 500페이지를 넣어야 하지만, 다음과 같이 매우 간략한 설명을 할 것이다.
이제 몇가지가 명확해졌을 것이다. HibernateDaoSupport와 HibernateTemplate은 Spring 프레임워크의 클래스들이다. Hibernate의 DAO 객체를 쉽게 작성하기 위해 Spring 프레임워크에 의해 생성되었다. 이 DAO를 지원하기 위해서 simple-persist 의 Spring ApplicationContext 정의에 몇가지 설정을 필요로 한다. 예제 7-10에 보여지는 XML 문서는 applicationContext-persist.xml라는 이름의 파일에 src/main/resources에 저장된다.
이 어플리케이션 컨텍스트에서 몇가지를 수행했다. sessionFactory 빈은 DAO가 Hibernate의 Session 객체를 가지고 오는 빈이다. 이 빈은 AnnotationSessionFactoryBean의 인스턴스이며 annotatedClasses의 목록 형태로 제공된다. 어노테이션이 있는 클래스의 목록은 simple-model 모듈에 정의된 클래스 목록임을 유의하라. 그 다음 sessionFactory는 몇가지 Hibernate 설정 속성 (hibernateProperties)들로 설정된다. 위의 예제에서 Hibernate 속성들은 다음과 같은 것들을 정의한다.
마지막으로 이 빈 정의 파일에서 simple-persist의 DAO 객체 모두가 생성되며 방금 정의한 sessionFactory 빈에 대한 참조가 주어진다. simple-weather의 Spring 어플리케이션 컨텍스트와 같이 이 applicationContext-persist.xml 파일은 더 큰 전사 설계에서 하위 모듈의 아키텍처를 정의한다. 만일 더 큰 저장 클래스들을 가지고 작업하고 있다면, 어플리케이션과는 분리되는 어플리케이션 컨텍스트에 이러한 것들을 포함하는 것이 유용하다는 것을 발견할 것이다.
simple-persist 에서 마지막 퍼즐조각이 있다. 이장의 이후에 어노테이션이 있는 모델 객체로부터 DB 스키마를 생성하는 Maven Hibernate3 플러그인을 어떻게 사용하는지를 살펴볼 것이다. 이를 위해 동작을 올바로 하려면, Maven Hibernate3 플러그인은 JDBC 연결 설정 파라미터, 어노테이션이 있는 클래스 목록, src/main/resources에 hibernate.cfg.xml 라는 파일로부터 다른 Hibernate 설정 등을 읽을 필요가 있다. 이 파일(applicationContext-persist.xml 의 설정 일부분이 겹침)의 목적은 작성된 어노테이션으로부터 Maven Hibernate3 플러그인이 DDL을 생성하도록 만든다. 예제 7-11을 참고하라.
예제 7-10과 예제 7-11의 내용은 겹친다. Spring 어플리케이션 컨텍스트 XML은 웹 어플리케이션과 명령행 어플리케이션에 의해 사용되는 반면에, hibernate.cfg.xml는 메이븐의 Hibernate3 플러그인을 지원하는 용도로만 사용된다. 이장의 이후에 이 hibernate.cfg.xml 와 simple-model에 정의된 어노테이션이 있는 객체 모델을 기반으로 DB 스키마를 생성하는 Maven Hibernate3 플러그인을 어떻게 사용하는지를 살펴볼 것이다. hibernate.cfg.xml 파일은 JDBC 연결 속성을 설정하고 Maven Hibernate3 플러그인에 대해 어노테이션이 있는 모델 클래스의 목록을 나열하는 파일이다.
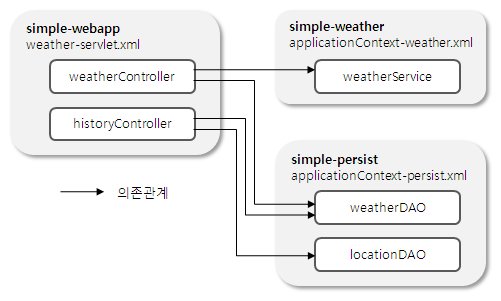
7.6 간단한 웹 어플리케이션 모듈
웹 어플리케이션은 simple-webapp 프로젝트에 정의된다. simple 웹 어플리케이션 프로젝트는 WeatherController과 HistoryController이라는 두개의 Spring MVC 컨트롤러를 정의하게 된다. 이 두개의 컨트롤러는 simple-weather와 simple-persist에 정의된 컴포넌트를 참조하게 된다. Spring 컨테이너는 simple-weather의 applicationContext-weather.xml 파일과 simple-persist의 applicationContext-persist.xml 파일을 참조하는 어플리케이션의 web.xml 에 설정된다. 이 간단한 웹 어플리케이션의 컴포넌트 아키텍처가 그림 7-3에 나타나 있다.
simple-webapp을 위한 POM이 예제 7-12에 나타난다.
이책이 진행함에 따라 그리고 예제가 점점 더 커짐에 따라 pom.xml이 어떤 무게를 가지기 시작함을 느낄 수 있을 것이다. 위의 POM에서 네개의 의존관계와 두개의 플러그인을 설정하고 있다. 이 POM을 세부적으로 살펴보고 몇가지 중요한 설정 부분에 대해 생각해보도록 하자.
다음은 모든 요청을 처리하는 두개의 Spring MVC 컨트롤러로 관심을 옮긴다 이 두개의 컨트롤러는 simple-weather와 simple-persist에 정의된 빈을 참조하고 있다. 예제 7-13을 참고하라.
WeatherController는 예제에 나타난 시그너처를 사용해 handleRequest() 메소드를 구현하도록 하는 Spring MVC의 Controller 인터페이스를 구현하고 있다. 만일 이 메소드의 본질을 보려면, weatherService 인스턴스 변수의 retrieveForecast() 메소드를 호출하는 것을 볼 수 있을 것이다. WeatherService 클래스를 인스턴스화 시키는 서블릿을 가지는 이전 장과 달리, WeatherController는 weatherService 속성을 가진 빈이다. Spring IoC 컨테이너는 weatherService 컴포넌트에 컨트롤러를 엮는(wiring) 것을 담당하고 있다. 또한 이 Spring 컨트롤러 구현에서 WeatherFormatter를 사용하고 있지 않음을 유의하라. 대신에 ModelAndView의 생성자에게 retrieveForecast()에 의해 반환되는 Weather객체를 넘기고 있다. ModelAndView클래스는 Velocity 템플릿을 사용하게 되며, 이 템플릿은 ${weather} 변수에 대한 참조를 가진다. weather.vm 템플릿은 src/main/webapp/WEB-INF/vm에 저장되며 예제 7-14에 나타난다.
WeatherController에서 예상날씨를 출력하기 전에 WeatherService로부터 반환받은 Weather객체를 WeatherDAO의 save() 메소드로 넘긴다. 여기서 Hibernate를 사용해서 HSQLDB에 Weather객체를 저장한다. 나중에 HistoryController에서 WeatherController가 저장했던 날씨 예상에 관한 이력을 어떻게 조회할 수 있는지를 살펴볼 것이다.
Velocity 템플릿의 문법은 직관적이다. 변수는 ${} 표기를 사용해서 참조된다. 중괄화 사이의 표현식은 WeatherController에 의해 해당 템플릿으로 넘겨진 weather 변수의 속성, 혹은 속성의 속성을 참조한다.
HistoryController는 WeatherController에 의해 요청되었던 최근 날씨정보를 조회하는데 사용된다. WeatherController로부터 날씨정보를 조회할때마다 해당 컨트롤러는 WeatherDAO를 통해 DB에 Weather 객체를 저장한다. WeatherDAO는 그 다음에 관련 DB 테이블들의 여러 행들에 Weather 객체를 분해하기 위해 Hibernate를 사용한다. HistoryController는 예제 7-15에 보여진다.
HistoryController는 simple-persist에 정의된 두개의 DAO 객체에 엮여져있다. DAO는 HistoryController의 빈 속석으로 WeatherDAO와 LocationDAO이다. HistoryController의 목적은 우편번호 파라미터에 대응하는 Weather 객체의 List를 조회하는 것이다. WeatherDAO가 DB에 Weather 객체를 저장할 때 우편번호만을 저장하지 않는다. simple-model의 Weather 객체와 관련된 Location 객체를 저장한다. Weather 객체의 List를 조회하려면 HistoryController는 먼저 우편번호 파라미터에 해당하는 Location 객체르 조회한다. 이는 LocationDAO의 findByZip() 메소드를 호출함으로써 수행한다.
일단 Location 객체가 조회되었다면, 그 다음에 HistoryController 는 주어진 Location과 일치하는 최근의 Weather 객체들을 조회하려고 할 것이다. 일단 List<Weather>가 조회되었다면, HashMap이 예제 7-16에 보여지는 history.vm Velocity 템플릿에 대한 두개의 변수를 담기 위해 생성된다.
src/main/webapp/WEB-INF/vm 에 있는 history.vm 템플릿은 WeatherDAO에 의해서 조회되는 날씨 정보의 위치에 대한 정보를 출력하기 위해 location 변수를 참조한다. 이 템플릿은 그 다음에 weathers 변수의 각 요소를 접근하는 접근하기 위해 Velocity 제어 구조인 #foreach를 사용한다. weathers의 각 요소는 weather라는 이름의 변수에 할당되며, #foreach와 #end 사이의 템플릿은 각 날씨정보에 대해 조회한다.
이러한 Controller 구현에 대해서 이미 보았고, simple-weather와 simple-persist에 정의된 다른 빈들을 참조하는 것을 보았다. 이들은 HTTP 요청에 대해 응답하고, Velocity 템플릿을 사용하는 방법을 아는 템플릿 시스템으로 제어를 이양한다. 모든 이러한 내용은 src/main/webapp/WEB-INF/weather-servlet.xml 에 있는 Spring의 어플리케이션 컨텍스트에서 설정된다. ServletContextListener에 의해 로딩되며, 클래스패스로부터 applicationContext-weather.xml과 applicationContext-persist.xml를 로딩하기 위해 또한 설정된다. 예제 7-17에 있는 weather-servlet.xml을 더 자세하게 살펴보자.
따라서, simple-webapp 프로젝트는 웹 어플리케이션에 대한 기본적인 설정을 제공하는 web.xml 이었다. web.xml는 예제 7-18에 나타난다.
(1) 여기서 이 프로젝트에서 applicationContext-weather.xml과 applicationContext-persist.xml을 재사용할 수 있는 약간의 마술이 있다. contextConfigLocation은 ApplicationContext을 생성하기 위해 ContextLoaderListener에 의해 사용된다. weather 서블릿이 생성될 때, 예제 7-17의 weather-servlet.xml은 이 contextConfigLocation로부터 생성된 ApplicationContext와 같이 사용될 것이다. 이러한 방법으로 또 다른 프로젝트에서 빈들을 정으할 수 있고 클래스패스를 통해 이러한 빈들을 참조할 수 있다. simple-persist와 simple-weather JAR들이 WEB-INF/lib에 위치할 것이기 때문에 해당 파일들을 참조하는 classpath:접두어를 사용하기만 하면 된다. (또 다른 방법은 해당 파일들을 /WEB-INF에 복사하고 /WEB-INF/applicationContext-persist.xml와 같은 방식으로 참조하는 것이다.)
(2) log4jConfigLocation은 Log4J 로깅 설정을 검색하는 Log4JConfigListener에 전달하는데 사용된다. 위의 예제에서 /WEB-INF/log4j.properties에서 검색하도록 Log4J에게 전달하고 있다.
(3) 웹 어플리케이션이 시작할 때 Log4J 시스템이 설정됨을 보장한다. ContextLoaderListener 이전에 Log4JConfigListener를 넣는 것이 중요하다. 그렇지 않으면 어플리케이션 기동을 막는 문제를 집어내는 중요한 로깅 메시지를 놓칠 수도 있다. 특히 많은 양의 빈들이 Spring에 의해서 관리되고 이 빈들 중 하나가 어플리케이션 기동에서 놓치게 되는 일이 발생하면 어플리케이션은 실패할 것이다. Spring이 시작하기 전에 초기의 로깅을 남긴다면 경고나 에러를 포착할 수 있는 기회를 가질 것이다. Spring이 시작하기전에 초기에 로깅을 남기지 못한다면 왜 어플리케이션이 기동하지 못했는지에 대한 아무런 내용을 알지 못할 것이다.
(4) ContextLoaderListener는 기본적으로 Spring 컨테이너이다. 어플리케이션이 시작할 때 이 리스너는 contextConfigLocation 파라미터로부터 ApplicationContext를 생성하게 된다.
(5) weather라는 이름을 가진 Spring MVC인 DispatcherServlet를 정의한다. 이것은 Spring에게 /WEB-INF/weather-servlet.xml에서 Spring 설정 파일을 찾도록 한다. 필요한 만큼 많은 DispatcherServlet를 선언할 수 있다. DispatcherServlet은 하나 이상의 Spring MVC 컨트롤로 구현체를 포함할 수 있다.
(6) .x로 끝나는 모든 요청은 weather 서블릿으로 보내진다. .x 확장자는 아무런 의미가 없음을 유의하라. 임의의 값을 사용했으며 선호하는 URL 패턴을 사용할 수 있다.
7.7 웹 어플리케이션 실행
웹 어플리케이션을 실행하려면 먼저 Hibernate3 플러그인을 사용해서 DB를 만들어야 한다. 이렇게 하기 위해 simple-webapp 프로젝트 디렉토리에서 다음을 실행한다.
이와 같이 실행하고 나면 HSQLDB DB를 포함하는 ${basedir}/data 디렉토리가 있을 것이다. 그 다음에 웹 어플리케이션을 다음과 같이 실행할 수 있다.
일단 Jetty가 시작되면, http://localhost:8080/simple-webapp/weather.x?zip=60202 를 접속할 수 있으며, 웹 브라우저에서 일리노이즈 주의 에반스톤의 날씨를 볼 수 있다. 우편번호를 바꾸면 해당 지역의 날씨정보를 볼 수 있을 것이다.
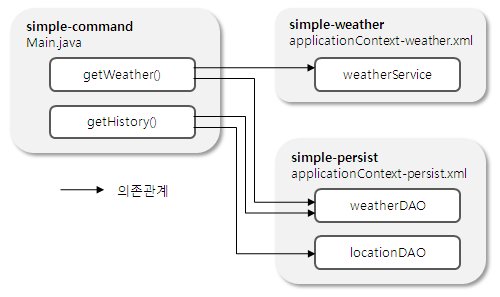
7.8 simple-command 모듈
simple-command 프로젝트는 simple-webapp의 명령행 버전이다. 동일한 의존관계인 simple-persist와 simple-weather에 의존하고 있는 유틸리티이다. 웹 브라우저를 통해 해당 어플리케이션과 상호작용하는 대신에 명령행에서 simple-command 유틸리티를 실행하게 된다. 그림 7-4와 예제 7-19를 참고하라.
위의 POM은 예제 7-20에 나타난 org.sonatype.mavenbook.weather.Main 클래스를 포함하는 JAR 파일을 생성한다. 해당 POM에서 빌드하는 프로젝트로부터의 바이트코드와 모든 의존관계 바이트코드를 포함하여 프로젝트가 실행하는데 필요한 모든 바이트코드를 포함하는 단일 JAR 파일을 생성하는 jar-with-dependencies라는 이름의 내장 어셈블리 디스크립터를 사용하는 Maven Assembly 플러그인을 설정한다.
Main 클래스는 WeatherDAO, LocationDAO, WeatherService 를 참조한다. 이 클래스의 정적 main() 메소드는
웹 어플리케이션에서 Velocity 템플릿을 로딩하는 Spring의 VelocityViewResolver를 사용했다. 독립 구현체에서는 Velocity 템플릿을 가지고 날씨 데이터를 로딩하는 간단한 클래스를 작성할 필요가 있다. 예제 7-21은 날씨 보고와 날씨 이력을 조회하는 두개의 메소드를 가진 클래스인 WeatherFormatter의 내용이다.
weather.vm 템플릿은 예제 7-22에 나타난 바와 같이 우편번호의 도시, 국가, 지역 뿐만 아니라 현재 온도를 단순히 보여준다. history.vm 템플릿은 지역을 보여주고 그 다음에 예제 7-23에 나타난 바와 같이 로컬 DB에 저장된 날씨 정보들을 반복한다. 이 템플릿 모두 ${basedir}/src/main/resources에 있다.
7.9 simple-command 실행
simple-command 프로젝트는 프로젝트의 바이트코드와 의존관계의 모든 바이트코드를 포함하는 단일 JAR를 생성하도록 설정된다. 이 어셈블리를 생성하려면, simple-command 프로젝트 디렉토로부터 Maven Assembly 플러그인의 assembly goal을 실행한다.
빌드는 바이트코드를 컴파일하고, 테스트를 실행하고, 최종적으로 프로젝트에 대한 JAR를 빌드하는 생명주기를 통해 진행된다. 그 다음에 assembly:assembly goal은 임시 디렉토리에 모든 의존관계를 풀어서 의존관계와 같이 JAR 를 생성한 다음에 simple-command-jar-with-dependencies.jar 라는 이름으로 target/에 단일 JAR로 모든 바이트코드를 묶는다. 이렇게 만들어진 JAR는 15MB 정도가 된다.
command-line 도구를 실행하기 전에 HSQLDB DB를 생성하는 Hibernate3 플러그인의 hbm2ddl goal을 호출할 필요가 있다. simple-command 디렉토리의 다음 명령을 실행함으로써 수행한다.
일단 이렇게 실행되면, simple-command 밑에 data/ 디렉토리를 볼 수 있다. 이 data/ 디렉토리는 HSQLDB DB를 포함한다. command-line 날씨 정보를 실행하려면, simple-command 프로젝트 디렉토리에서 다음을 실행한다.
이력 조회를 실행하려면, 다음의 명령을 실행한다.
7.10. 결론
이곳까지 다다르기 위해서 메이븐과 직접적으로 관련이 없는 내용에 대해 많은 시간을 할해했다. 실세계 시스템을 구현하는데 사용될 수 있는 완전하고 의미있는 예제 프로젝트를 제시함으로써 위와 같이 설명했다. 멋들어지고, 규격화된 결과를 빨리 얻으려고 빠른 길을 선택하지 않았으며, Ruby on Rails 풍의 기술을 사용해서 현혹하고 “쉬운 10분!”에 완성된 자바 엔터프라이즈 어플리케이션을 만들수 있다는 믿음을 부여하지 않았다. 시장에는 이러한 내용들이 많이 있다. 시간이나 노력을 거의 투자하지 않는 가장 쉬운 프레임워크를 판매하려는 사람들이 많이 있다. 이 장에서 하려고 했던 것은 전체 그림, 즉 다중 모듈 빌드에 대한 전체 생태계를 제시하는 것이다. 아파치 Ant를 비방하고 아파치 메이븐을 적용하는데 설득하는 빠르고, 10분의 설명을 붙이는 것이 아닌 생생하게 살아있는 것을 보여주는 것과 유사한 어플리케이션의 영역에서 메이븐을 보여주었다.
메이븐과 관련된 내용에 대해 궁금한 것을 이장을 통해 해결되었다면 성공한 것이다. 유명한 프레임워크들을 사용해서 복잡한 프로젝트를 제시했고, 선언적인 빌드를 사용해서 같이 묶었다. 이장의 60% 이상이 Spring과 Hibernate를 설명하는 것으로 채워졌다는 사실은 대부분이 메이븐은 별도로 떨어져 있다는 것이다. 그 자체로 작동했다. 빌드 프로세스가 아니라 어플리케이션 그 자체에 중점을 두도록 했다. 메이븐을 설명하는데 시간을 사용하고, Spring과 Hibernate와 통합된 “빌드를 빌드” 해야만 했던 작업 대신에 이와 같이 만들어진 프로젝트에서 사용된 기술에 대해 거의 오로지 설명했다. 메이븐을 사용하기 시작하고, 배우려는 시간을 가지려면, 진정으로 절차적인 빌드 스크립트를 작성하는데 시간을 보낼 필요가 없다는 사실로부터 이점을 얻기 시작할 것이다. 빌드에 대한 현실적인 부분에 대해 걱정하는데 시간을 보낼 필요가 없다.
이 장에서 소개한 개략적인 프로젝트를 여러분 자신의 기반으로 사용할 수도 있으며, 그렇게 한다면 필요한 만큼 더 복잡한 모듈을 만드는 기회로 삼을 수 있다. 예를 들어, 이 장에서의 프로젝트는 두개의 서로 다른 모델 프로젝트와, 서로 다른 DB에 저장하는 두개의 저장 프로젝트, 몇 개의 웹 어플리케이션, 자바 모바일 어플리케이션을 가지게 된다. 전반적으로 실세계 시스템은 최소한 15개의 서로 관련된 모듈로 구성된다. 요점은 이 장에서 포함될 가장 복잡한 다중 모듈을 보았다는 것이지만, 이 장의 예제는 단지 메이븐에서 가능한 것의 표면만을 살펴보았다는 것을 역시 알아야 한다.
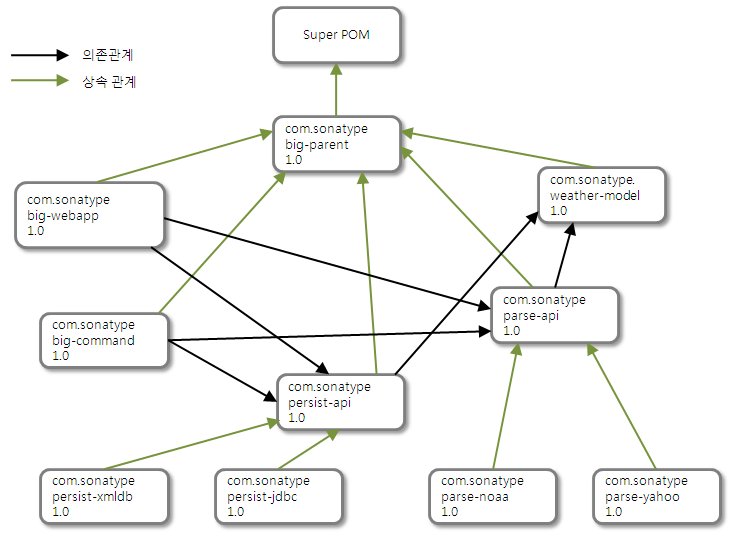
이 장에서 6장에 나타난 간단한 예제보다 더 복잡한 다중 모듈 프로젝트를 살펴보았지만, 여전히 실세계 프로젝트에 비해 단순하다. 더 큰 프로젝트에서 그림 7-5와 유사한 시스템을 빌드하는 것을 발견할 수도 있다.
이 장에서 5장과 6장의 예제를 야후 날씨 피드로부터 데이터를 읽는 간단한 웹 어플리케이션과 명령행 유틸리티로 만들기 위해 Spring 프레임워크와 Hibernate를 사용하는 프로젝트로 발전시키는 다중 모듈 프로젝트를 생성한다. 4장에서 만든 simple-weather 코드는 5장에서 정의된 simple-webapp 프로젝트로 합해진다. 이러한 다중 모듈 프로젝트를 생성하는 과정에서 메이븐을 살펴보고 재사용을 위한 모듈 프로젝트를 생성하는데 사용될 수 있는 서로 다른 방법을 설명할 것이다.
7.1.1. 이 장의 예제 다운로딩
이 예제에서 만든 다중 모듈 프로젝트는 4장과 5장에서 만든 프로젝트의 수정된 버전으로 구성되며, 이 다중 모듈 프로젝트를 생성하기 위해 Maven Archetype 플러그인을 사용하지 않는다. 이 장의 내용을 읽는 동안 보충 자료로 사용하는 예제 코드의 복사본을 다운로드받는 것을 강력히 권한다. 예제없이 이 장의 예제 코드를 재생성할 수 없을 것이다. 이 장의 에제 프로젝트는 http://www.sonatype.com/book/mvn-examples-1.0.zip 나 http://www.sonatype.com/book/mvn-examples-1.0.tar.gz의 책의 예제 코드와 같이 다운로드받을 수 있다. 디렉토리에 이 파일을 압축을 풀고, 이 장에서 만들 다중 모듈 메이븐 프로젝트로 이동하라. simple-parent/ 프로젝트 디렉토리에서 pom.xml 와 5개의 하위 모듈 디렉토리인 simple-model/, simple-persist/, simple-command/, simple-weather/, simple-webapp/ 를 볼 수 있을 것이다. 웹 브라우저에서 예제코드를 보기 원한다면, http://www.sonatype.com/book/examples-1.0 로 이동해서, ch07/ 디렉토리를 클릭하라.
7.1.2. 다중 모듈 엔터프라이즈 프로젝트
대형 엔터프라이즈 수준의 프로젝트에 대한 복잡성을 제시하는 것은 이 책의 범위를 훨씬 넘어서는 것이다. 그러한 프로젝트들은 다중 DB와, 외부 시스템과의 통합, 부서로 구획화되는 하위 프로젝트들로 규정된다. 이러한 프로젝트들은 통상 수천 라인의 코드로 구성되며 수십 혹은 수백명의 개발자 공수와 관련된다. 그러한 완전한 예제가 이 책의 범위 밖의 것이라도, 대형 엔터프라이즈 어플리케이션의 복잡성을 제시하는 동일한 프로젝트를 제공할 수 있다. 결론적으로, 이 장에서 설명된 것 이상의 모듈화에 대한 어떤 가능성을 제시한다.
이 장에서 두개의 어플리케이션인 야후 날시 피드에 대한 명령행 질의 도구와, 야후 날씨 피드를 검색하는 웹 어플리케이션을 만드는 다중 모듈 메이븐 프로젝트를 살펴볼 것이다. 이 두개의 어플리케이션은 내장된 DB에 질의 결과를 저장한다. 각각은 사용자가 내장된 DB로부터 이전 날시 데이터를 조회하는 것을 가능하게 한다. 두개의 어플리케이션은 어플리케이션 로직을 재사용하며 저장 라이브러리를 공유한다. 이 장의 예제는 4장에서 소개한 야후 날씨 파싱 코드에 대해 빌드한다. 이 프로젝트는 그림 7-1에 나타난 바와 같이 5개의 하위 모듈로 나뉜다.
그림 7-1. 다중 모듈 엔터프라이즈 어플리케이션의 모듈 관계
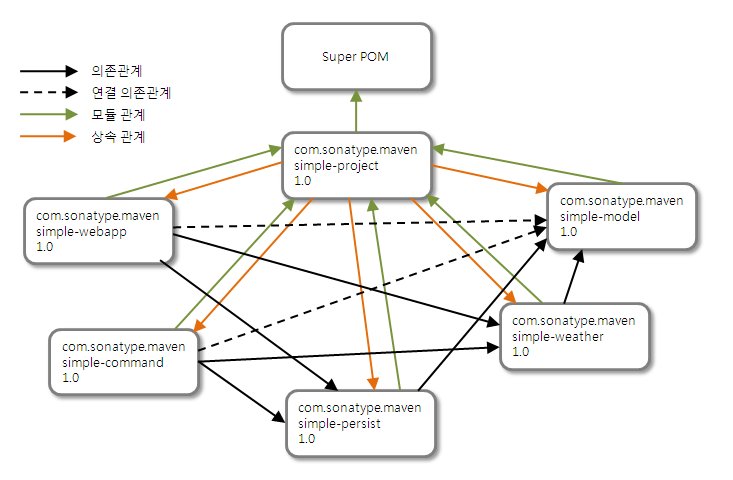
그림 7-1에서 simple-parent의 5가지 하위 모듈이 있음을 볼 수 있을 것이다.
그림 7-1에서 simple-parent의 5가지 하위 모듈이 있음을 볼 수 있을 것이다.
simple-model
이 모듈은 야후 날씨 피드로부터 반환되는 객체를 모델링한 간단한 객체 모델을 정의한다. 이 객체 모델은 Weather, Condition, Atmosphere, Location, Wind 객체를 포함한다. 어플리케이션이 야후 날씨 피드를 파싱할 때, simple-weather 에 정의된 파서는 XML을 파싱하고 어플리케이션에 의해서 사용될 Weather 객체를 생성한다. 이 프로젝트는 각각의 모델 객체를 관계형 DB의 해당 테이블로 매핑하기 위해 simple-persist 의 로직에 의해서 사용되는 Hibernate 3 어노테이션으로 표기된 모델 객체를 포함한다.
이 모듈은 야후 날씨 피드로부터 반환되는 객체를 모델링한 간단한 객체 모델을 정의한다. 이 객체 모델은 Weather, Condition, Atmosphere, Location, Wind 객체를 포함한다. 어플리케이션이 야후 날씨 피드를 파싱할 때, simple-weather 에 정의된 파서는 XML을 파싱하고 어플리케이션에 의해서 사용될 Weather 객체를 생성한다. 이 프로젝트는 각각의 모델 객체를 관계형 DB의 해당 테이블로 매핑하기 위해 simple-persist 의 로직에 의해서 사용되는 Hibernate 3 어노테이션으로 표기된 모델 객체를 포함한다.
simple-weather
이 모듈은 야후 날씨 피드로부터 데이터를 읽어서 결과 XML로 파싱하는데 필요한 모든 로직을 포함한다. 이 피드로부터 반환되는 XML은 simple-model 에 정의되는 모델 객체로 변환된다. simple-weather는 simple-model에 대해 의존관계를 가진다. simple-weather는 simple-command와 simple-webapp 프로젝트 모두에 의해 참조되는 WeatherService 객체를 정의한다.
이 모듈은 야후 날씨 피드로부터 데이터를 읽어서 결과 XML로 파싱하는데 필요한 모든 로직을 포함한다. 이 피드로부터 반환되는 XML은 simple-model 에 정의되는 모델 객체로 변환된다. simple-weather는 simple-model에 대해 의존관계를 가진다. simple-weather는 simple-command와 simple-webapp 프로젝트 모두에 의해 참조되는 WeatherService 객체를 정의한다.
simple-persist
이 모듈은 내장 DB에 Weather 객체를 저장하는데 설정되는 DAO(Data Access Object)를 포함한다. 이 다중 모듈 프로젝트에서 정의된 두개의 어플리케이션은 내장 DB에 데이터를 저장하기 위해 simple-persist에 정의된 DAO를 사용하게 된다. 이 프로젝트에서 정의된 DAO는 simple-model 에서 정의된 모델 객체를 이해하고 반환한다. simple-persist는 simple-model에 대해 직접적으로 연관관계를 맺으며, 모델 객체에 표현된 Hibernate 어노테이션에 대해 의존관계를 가진다.
이 모듈은 내장 DB에 Weather 객체를 저장하는데 설정되는 DAO(Data Access Object)를 포함한다. 이 다중 모듈 프로젝트에서 정의된 두개의 어플리케이션은 내장 DB에 데이터를 저장하기 위해 simple-persist에 정의된 DAO를 사용하게 된다. 이 프로젝트에서 정의된 DAO는 simple-model 에서 정의된 모델 객체를 이해하고 반환한다. simple-persist는 simple-model에 대해 직접적으로 연관관계를 맺으며, 모델 객체에 표현된 Hibernate 어노테이션에 대해 의존관계를 가진다.
simple-webapp
웹 어플리케이션 프로젝트는 simple-weather 에서 정의된 WeatherService 와 simple-persist에서 정의된 DAO를 사용하는 두개의 Spring MVC Controller 구현체를 포함한다. simple-webapp는 simple-weather와 simple-persist에 대해 직접적으로 의존관계를 가지며, simple-model 에 대해 연결 의존관계를 가진다.
웹 어플리케이션 프로젝트는 simple-weather 에서 정의된 WeatherService 와 simple-persist에서 정의된 DAO를 사용하는 두개의 Spring MVC Controller 구현체를 포함한다. simple-webapp는 simple-weather와 simple-persist에 대해 직접적으로 의존관계를 가지며, simple-model 에 대해 연결 의존관계를 가진다.
simple-command
이 모듈은 야후 날씨 피드를 조회하는데 사용될 수 있는 간단한 명령행 도구를 포함한다. 이 프로젝트는 정적 main() 함수를 가지는 클래스를 포함하며 simple-weather에서 정의된 WeatherService와 simple-persist에서 정의된 DAO와 상호작요한다. simple-command는 simple-weather와 simple-persist에 대해서 직접적인 의존관계를 가지며, simple-model에 대해 연결 의존관계를 가진다.
이 모듈은 야후 날씨 피드를 조회하는데 사용될 수 있는 간단한 명령행 도구를 포함한다. 이 프로젝트는 정적 main() 함수를 가지는 클래스를 포함하며 simple-weather에서 정의된 WeatherService와 simple-persist에서 정의된 DAO와 상호작요한다. simple-command는 simple-weather와 simple-persist에 대해서 직접적인 의존관계를 가지며, simple-model에 대해 연결 의존관계를 가진다.
이 장은 책에서 소개하기에 간단한 고안된 예제를 포함하지만, 5개의 하위모듈을 정의하는데는 충분히 복잡하다. 고안된 예제는 5개의 클래스와 두개의 서비스 클래스를 가진 저장 라이브러리, 5~6개의 클래스를 갖는 날씨 파싱 라이브러리를 가지는 모델 프로젝트를 포함하지만, 실제 세계의 시스템은 수백개의 객체와, 수십개의 저장 라이브러리들, 여러 부서로 확장된 서비스 라이브러리들을 포함하는 모델 프로젝트를 가질 수도 있다. 이 예제에서 포함된 코드는 짧은 시간 동안 이해하는데 충분히 직관적이라고 인정하지만, 일부러 모듈화 프로젝트에 대한 빌드를 수행했다. 이 장의 예제를 살펴보려고 하고 현재의 모델 프로젝트가 단지 5개의 클래스만을 가지고 있다는 사실에 Maven이 너무나도 복잡한 것을 조성한다는 생각을 쉽게 생각할 수도 있다. Maven 사용이 특정 수준의 모듈화를 제시하고 있지만, Maven의 다중 모듈 기능을 소개하려는 목적으로 단순한 예제 프로젝트를 고의로 복잡하게 구성했음을 이해하라.
7.1.3. 예제에서 사용된 기술
이 장의 예제는 유명하지만 메이븐과 직접적으로 관계가 없는 몇가지 기술과 관련된다. 이러한 기술들에는 Spring 프레임워크와 Hibernate가 있다. Spring 프레임워크는 제어 역행(IoC) 컨테이너로 다양한 J2EE 라이브러리와의 상호작용을 단순화시키려는 목적을 가진 여러 프레임워크로 구성된다. 어플리케이션 개발에 기반 프레임워크로 Spring 프레임워크를 사용한다는 것은 Hibernate나 iBATIS와 같은 저장 프레임워크나 혹은 JDBC, JNDI, JMS와 같은 엔터프라이즈 API를 사용해서 처리하는 업무에 대한 여러 업무 처리를 수행할 수 있는 수많은 도움이 되는 추상화에 대한 접근을 제공하는 것이다. Spring 프레임워크는 Sun Microsystems의 중량 엔터프라이즈 표준에 대한 대체로 과거 수년 동안 인기를 누리고 있다. Hibernate는 관계형 DB를 자바 객체의 집합체로 보면서 상호작용을 가능하게 하는 널리 사용되는 OR 매핑 프레임워크이다. 이 예제는 어플리케이션에 대해 재사용 가능한 컴포넌트를 노출시키는 Spring 프레임워크를 사용하고 내장 DB에 날씨 데이터를 저장하는데 Hibernate를 사용하는 간단한 웹 어플리케이션과 명령행 어플리케이션 구축에 초점을 둔다.
Maven을 사용할 때 이러한 기술을 사용하여 프로젝트를 어떻게 구성할지를 설명하기 위해 이러한 프레임워크에 대한 참고를 추가하기로 결정했다. 이 장으로 통해 이러한 기술들을 간략하게 소개하고는 있지만, 이러한 기술에 대한 전체적인 설명을 하지는 않을 것이다. Spring 프레임워크에 대한 더 많은 정보는 프로젝트의 웹 사이트인 http://www.springframework.org/ 를 참고하라. Hibernate와 Hibernate 어노테이션에 대한 더 많은 정보에 대해서는 프로젝트의 웹 사이트인 http://www.hibernate.org 를 참고하라. 이 장은 내장 DB로 HSQLDB (Hyper-threaded Structured Query Language Database)를 사용하며, 이 DB에 대한 더 많은 정보는 웹 사이트인 http://hsqldb.org/ 를 참고하라.
7.2. 간단한 부모 프로젝트
simple-parent 프로젝트는 5개의 하위 모듈인 simple-command, simple-model, simple-weather, simple-persist, simple-webapp를 참조하는 pom.xml 를 가진다. 최상위 pom.xml 은 예제 7-1에 나타난다.
예제 7-1. simple-parent 프로젝트의 POM
<project xmlns="http://maven.apache.org/POM/4.0.0"
xmlns:xsi="http://www.w3.org/2001/XMLSchema-instance"
xsi:schemaLocation="http://maven.apache.org/POM/4.0.0
http://maven.apache.org/maven-v4_0_0.xsd">
<modelVersion>4.0.0</modelVersion>
<groupId>org.sonatype.mavenbook.ch07</groupId>
<artifactId>simple-parent</artifactId>
<packaging>pom</packaging>
<version>1.0</version>
<name>Chapter 7 Simple Parent Project</name>
<modules>
<module>simple-command</module>
<module>simple-model</module>
<module>simple-weather</module>
<module>simple-persist</module>
<module>simple-webapp</module>
</modules>
<build>
<pluginManagement>
<plugins>
<plugin>
<groupId>org.apache.maven.plugins</groupId>
<artifactId>maven-compiler-plugin</artifactId>
<configuration>
<source>1.5</source>
<target>1.5</target>
</configuration>
</plugin>
</plugins>
</pluginManagement>
</build>
<dependencies>
<dependency>
<groupId>junit</groupId>
<artifactId>junit</artifactId>
<version>3.8.1</version>
<scope>test</scope>
</dependency>
</dependencies>
</project>
위의 부모 POM와 예제 6-1에서 정의한 부모 POM 간의 유사성에 유의하라. 이 두개의 POM 간의 유일한 차이는 하위모듈 목록이다. 이전 예제가 단지 2개의 하위 모듈을 가진 반면에, 위의 부모 POM은 5개의 하위모듈을 가지고 있다. 다음의 절에서는 이들 각각 5개의 하위 모듈에 대해 자세하게 다룰 것이다. 예제에서 자바 어노테이션을 사용하고 있기 때문에 컴파일러의 target을 Java 5 JVM으로 설정했다.
7.3. 간단한 모델 모듈
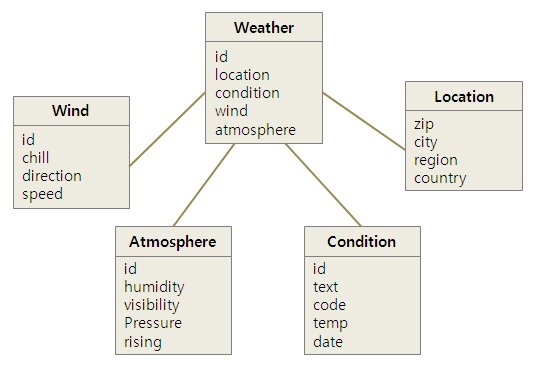
대부분의 엔터프라이즈 프로젝트가 필요로 하는 첫번째 것은 객체 모델이다. 객체 모델은 어떠한 시스템에서든지 핵심 도메인 객체를 담고 있다. 은행 시스템은 Account, Customer, Transaction 로 구성되는 객체 모델을 가질 것이며, 혹은 스포츠 점수를 담고 상호작용하는 시스템은 Team과 Game 객체를 가질 것이다. 어떠한 것이든, 객체 모델에 해당 시스템에 개념을 모델링하는 좋은 기회가 있다. Maven에서 이러한 프로젝트를 널리 참조되는 별도의 프로젝트로 분리하는 것이 보편적인 기법이다. 이 예제 시스템에서 4개의 다른 객체들을 참조하는 Weather 객체를 가진 야후 날씨 피드에 대한 각각의 질의를 담게된다. 풍향, 체감온도, 풍속이 Wind객체에 저장된다. 우편번호, 도시, 지역, 국가를 포함하는 위치 데이터가 Location 클래스에 저장된다. 습도, 최대 가시거리, 기압, 기압의 높고 낮음의 여부와 같은 대기 조건이 Atmosphere 클래스에 저장된다. 조건에 대한 문자 기술, 온도, 관측자의 데이터가 Condition 클래스에 저장된다. 그림 7-2를 참고하라.
그림 7-2. 날씨 데이터에 대한 간단한 객체 모델
이 간단한 객체 모델에 대한 pom.xml 파일은 어떤 설명을 포함하는 하나의 의존관계를 포함한다. 객체 모델은 Hibernate 어노테이션을 가지고 주해된다. 이러한 어노테이션을 해당 모델을 관계형 DB의 테이블로 매핑하는데 사용한다. 의존관계는 org.hibernate:hibernate-annotations:3.3.0.ga 이다. 예제 7-2에 나타난 pom.xml 을 살펴보고, 이러한 어노테이션에 대해 몇가지 예로 다음 예제들을 볼 수 있을 것이다.
예제 7-2. simple-model의 pom.xml
<project xmlns="http://maven.apache.org/POM/4.0.0"
xmlns:xsi="http://www.w3.org/2001/XMLSchema-instance"
xsi:schemaLocation="http://maven.apache.org/POM/4.0.0
http://maven.apache.org/maven-v4_0_0.xsd">
<modelVersion>4.0.0</modelVersion>
<parent>
<groupId>org.sonatype.mavenbook.ch07</groupId>
<artifactId>simple-parent</artifactId>
<version>1.0</version>
</parent>
<artifactId>simple-model</artifactId>
<packaging>jar</packaging>
<name>Simple Object Model</name>
<dependencies>
<dependency>
<groupId>org.hibernate</groupId>
<artifactId>hibernate-annotations</artifactId>
<version>3.3.0.ga</version>
</dependency>
<dependency>
<groupId>org.hibernate</groupId>
<artifactId>hibernate-commons-annotations</artifactId>
<version>3.3.0.ga</version>
</dependency>
</dependencies>
</project>
src/main/java/org/sonatype/mavenbook/weather/model에서 어노테이션을 포함한 Weather 모델 객체가 있는 Weather.java 를 볼 수 있다. Weather 객체는 단순한 자바빈이다. 이것은 id, location, condition, wind, atmosphere와 같은 private 멤버 변수를 가지고, 데이터들은 속성이 name 이라면, 인자가 없는 public getter 메소드인 getName()을 갖고, 하나의 인자를 갖는 setter로 setName(String name)을 갖는 것처럼 public getter와 setter 메소드들로 노출된다. Id 속성에 대해 getter와 setter 메소드를 보여주지만, 몇몇 값을 저장하는 대부분의 다른 속성에 대한 getter와 setter 대부분은 생략한다. 예제 7-3을 참고하라.
예제 7-3. 어노테이션이 있는 Weather 모델 객체
package org.sonatype.mavenbook.weather.model;
import javax.persistence.*;
import java.util.Date;
@Entity
@NamedQueries({
@NamedQuery(name="Weather.byLocation",
query="from Weather w where w.location = :location")
})
public class Weather {
@Id
@GeneratedValue(strategy=GenerationType.IDENTITY)
private Integer id;
@ManyToOne(cascade=CascadeType.ALL)
private Location location;
@OneToOne(mappedBy="weather",cascade=CascadeType.ALL)
private Condition condition;
@OneToOne(mappedBy="weather",cascade=CascadeType.ALL)
private Wind wind;
@OneToOne(mappedBy="weather",cascade=CascadeType.ALL)
private Atmosphere atmosphere;
private Date date;
public Weather() {}
public Integer getId() { return id; }
public void setId(Integer id) { this.id = id; }
// All getter and setter methods omitted...
}
Weather 클래스에서 simple-persist 프로젝트에 대한 가이드를 제공하는 Hibernate 어노테이션을 사용하고 있다. 이러한 어노테이션들은 객체를 관계형 DB의 테이블로 매핑하는데 Hibernate에 의해 사용된다. Hibernate 어노테이션에 대해 전체적으로 설명하는 것은 이 장의 범위를 넘어서는 것이지만, 여기에 간략하게 설명을 하겠다. @Entity 어노테이션은 해당 클래스를 저장 엔티티로 지정한다. 해당 클래스에 대해 @Table 어노테이션을 생략했는데, Hibernate는 클래스의 이름을 테이블의 이름으로 Weather 을 매핑하는데 사용한다. @NamedQueries 어노테이션은 simple-persist의 WeatherDAO가 사용하는 질의를 정의한다. @NamedQuery 어노테이션의 질의 언어는 HQL (Hibernate Query Language)라고 하는 것으로 작성된다. 각각의 멤버 변수는 컬럼 유형과 해당 컬럼에 의해 의미하는 관계로 정의되는 어노테이션으로 표시된다.
Id
id 속서은 @Id 의 어노테이션을 가진다. 이것은 DB 테이블의 PK를 포함하는 속성으로 id 속성을 표기한다. @GeneratedValue는 새로운 PK 값을 어떻게 생성할지를 통제한다. id의 경우, IDENTITY GenerationType 을 사용하고 있으며, 이는 내부 DB의 ID 생성 기능을 사용한다.
Location
각각의 Weather 객체 인스턴스는 Location 객체 대응된다. Location 객체는 우편번호로 표현되며, @ManyToOne은 Weather 객체가 동일한 인스턴스를 참조하는 동일한 Location 객체를 가리킴을 보증한다. @ManyToOne 의 cascade 속성은 Weather 객체를 저장할 때마다 Location 객체가 저장됨을 보장한다.
Condition, Wind, Atmosphere
이들 각각의 객체는 ALL이라는 CascadeType과 같이 @OneToOne으로 매핑된다. 이것은 Weather 객체를 저장할 때마다 Weather 테이블, Condition 테이블, Wind 테이블, Atmosphere 테이블에 해당 행을 입력하게 된다.
Date
Date는 어노테이션이 표기되지 않았다. 이것은 Hibernate가 이러한 매핑을 정의하는 컬럼 기본값에 대한 모든 것을 사용함을 의미한다. 컬럼명은 date 가 되며, 컬럼 유형은 Date객체에 일치하는 적절한 시간이 될 것이다.
유의
테이블 매핑에서 생략하고자 하는 속성에 대해서는 @Transient 어노테이션을 사용해서 해당 속성을 표기할 수 있다.
테이블 매핑에서 생략하고자 하는 속성에 대해서는 @Transient 어노테이션을 사용해서 해당 속성을 표기할 수 있다.
다음은 예제 7-4에 나타난 두번째 모델 객체들 중의 하나인 Condition 에 대해서 살펴보자. 이 클래스 역시 src/main/java/org/sonatype/mavenbook/weather/model에 위치한다.
예제 7-4. simple-model의 Condition 모델 객체
package org.sonatype.mavenbook.weather.model;
import javax.persistence.*;
@Entity
public class Condition {
@Id
@GeneratedValue(strategy=GenerationType.IDENTITY)
private Integer id;
private String text;
private String code;
private String temp;
private String date;
@OneToOne(cascade=CascadeType.ALL)
@JoinColumn(name="weather_id", nullable=false)
private Weather weather;
public Condition() {}
public Integer getId() { return id; }
public void setId(Integer id) { this.id = id; }
// All getter and setter methods omitted...
}
Condition 클래스는 Weather 클래스와 유사하다. @Entity 어노테이션으로 표기되며, id 속성에 대해 유사한 어노테이션을 가진다. text, code, temp, date 속성은 모두 기본 컬럼 세팅으로 표기되며, weather 속성은 @OneToOne 어노테이션과 weather_id라는 이름의 FK 컬럼을 가지는 관련 Weather 객체를 참조하는 또 다른 어노테이션으로 표기된다.
7.4. 간단한 날씨 모듈
다음에 설명하려는 모듈은 “서비스”라는 것으로 생각할 수 있다. Simple Weather 모듈은 야후 날씨 RSS 피드로부터 데이터를 읽고 파싱하는데 필요한 모든 로직을 담는 모듈이다. Simple Weather가 세개의 자바 클래스와 하나의 JUnit 테스트를 포함하고 있지만, Simple Web Application과 Simple Command-line Utility 모두에게 단일 컴포넌트인 WeatherService 로 표현될 것이다. 매우 종종 엔터프라이즈 프로젝트는 중요한 비즈니스 로직이나 외부 시스템과 연계되는 로직을 포함하는 몇몇 API 모듈을 포함하게 된다. 은행 시스템은 외부 데이터 제공자로부터 데이터를 읽어서 파싱하는 모듈을 가질 수 있으며, 스포츠 점수를 보여주는 시스템은 농구나 축구에 대한 실시간 점수를 제공하는 XML 피드와 상호작용할 수도 있다. 예제 7-5에서 이 모듈은 야후 날씨와 상호작용에 관련된 네트워크 작업과 XML 파싱의 모든 것을 감추게 된다. 다른 모듈들은 이 모듈에 대해 의존관계를 가지며 인자로 우편번호를 넘기고 Weather 객체를 반환하는 WeatherService의 retrieveForecast() 메소드를 단순히 호출한다.
예제 7-5. simple-weather 모듈 POM
<project xmlns="http://maven.apache.org/POM/4.0.0"
xmlns:xsi="http://www.w3.org/2001/XMLSchema-instance"
xsi:schemaLocation="http://maven.apache.org/POM/4.0.0
http://maven.apache.org/maven-v4_0_0.xsd">
<modelVersion>4.0.0</modelVersion>
<parent>
<groupId>org.sonatype.mavenbook.ch07</groupId>
<artifactId>simple-parent</artifactId>
<version>1.0</version>
</parent>
<artifactId>simple-weather</artifactId>
<packaging>jar</packaging>
<name>Simple Weather API</name>
<dependencies>
<dependency>
<groupId>org.sonatype.mavenbook.ch07</groupId>
<artifactId>simple-model</artifactId>
<version>1.0</version>
</dependency>
<dependency>
<groupId>log4j</groupId>
<artifactId>log4j</artifactId>
<version>1.2.14</version>
</dependency>
<dependency>
<groupId>dom4j</groupId>
<artifactId>dom4j</artifactId>
<version>1.6.1</version>
</dependency>
<dependency>
<groupId>jaxen</groupId>
<artifactId>jaxen</artifactId>
<version>1.1.1</version>
</dependency>
<dependency>
<groupId>org.apache.commons</groupId>
<artifactId>commons-io</artifactId>
<version>1.3.2</version>
<scope>test</scope>
</dependency>
</dependencies>
</project>
simple-weather POM은 simple-parent POM을 상속받고 있으며, jar로 패키징하도록 세팅되며, 다음과 같은 의존관계가 추가된다.
org.sonatype.mavenbook.ch07:simple-model:1.0
simple-weather는 Weather 객체에 야후 날씨 RSS 피드를 파싱한다. simple-model에 대해 직접적인 의존관계를 가진다.
log4j:log4j:1.2.14
simple-weather는 로그 메시지를 출력하는 Log4J 라이브러를 사용한다.
dom4j:dom4j:1.6.1 and jaxen:jaxen:1.1.1
이 의존관계 모두 야후 날씨로부터 반환되는 XML을 파싱하는데 사용된다.
org.apache.commons:commons-io:1.3.2 (scope=test)
이 테스트 영역의 의존관계는 YahooParserTest에 의해 사용된다.
다음은 예제 7-6에 나타난 WeatherService 클래스이다. 이 클래스는 예제 6-3의 WeatherService 클래스와 매우 유사하게 보일 것이다. WeatherService 가 동일하지만, 이 장의 예제에는 약간 다른 것이 있다. 이 장의 retrieveForecast() 메소드는 Weather 객체를 반환하고, 포맷팅은 WeatherService 를 호출하는 어플리케이션에 맡겨둔다. 다른 주요 변화는 YahooRetriever와 YahooParser 가 WeatherService 빈의 두가지 빈 속성이라는 것이다.
마지막으로 이 프로젝트에서 ApplicationContext 라고 하는 것을 만들기 위해 Spring 프레임워크에 의해 사용되는 XML 파일을 가진다. 먼저 몇가지 설명이 필요한데, 웹 어플리케이션과 명령행 유틸리티 모두는 WeatherService 클래스와 상호작용할 필요가 있으며, 모두 weatherService 라는 이름을 사용해서 Spring의 ApplicationContext 로부터 해당 클래스의 인스턴스를 조회함으로써 그와 같이 수행한다. 웹 어플리케이션은 WeatherService 인스턴스와 관련된 Spring MVC 컨트롤러를 사용하며, 명령행 유틸리티는 정적 main() 함수에 ApplicationContext로부터 WeatherService를 로딩한다. 재사용을 위해 src/main/resources에 applicationContext-weather.xml 파일을 포함시켰으며, 이는 클래스패스에서 사용 가능하다. simple-weather 모듈에 대한 의존관계를 가진 모듈들은 Spring 프레임워크의 ClasspathXmlApplicationContext를 사용해서 해당 어플리케이션 컨텍스트를 로딩할 수 있다. 그 다음에 weatherService로 명명된 WeatherService의 인스턴스를 참조할 수 있다. 예제 7-7을 참고하라.
위의 문서는 세가지 빈인 yahooParser, yahooRetriever, weatherService을 정의한다. weatherService 빈은 WeatherService의 인스턴스이며, 이 XML 문서는 해당 클래스의 명명된 인스턴스로의 참조를 가진 yahooParser와 yahooRetriever 속성을 사용한다. 이 applicationContext-weather.xml 파일을 이 다중 모듈 프로젝트의 하위 시스템의 구조를 정의하는 것으로 생각하라. simple-webapp와 simple-command와 같은 프로젝트들은 이 컨텍스트를 참조하고 YahooRetriever와 YahooParser의 인스턴스와 관계를 이미 가지는 WeatherService의 인스턴스를 가지고 온다.
7.5 Simple Persist 모듈
이 모듈은 두개의 매우 단순한 DAO(Data Access Object) 를 정의한다. DAO는 저장 오퍼레이션에 대한 인터페이스를 제공한다. Hibernate와 같은 객체-관계형 매핑(ORM) 프레임워크를 사용하는 어플리케이션에서 DAO는 객체주위에 보통 정의된다. 이 프로젝트에서 WeatherDAO와 LocationDAO의 두개의 DAO의 객체를 정의한다. WeatherDAO 클래스는 Weather 객체를 DB에 저장하고 id의 Weather 객체를 조회하고, 특정 위치와 일치하는 Weather를 조회한다. LocationDAO는 우편번호를 통해 Location 객체를 조회한다. 먼저, 예제 7-8의 simple-persist POM을 살펴보자.
위의 POM 파일은 부모 POM으로 simple-parent를 참조하며, 몇가지 의존관계를 정의한다. simple-persist의 POM에 있는 의존관계들은 다음과 같다.
예제 7-6. WeatherService 클래스
package org.sonatype.mavenbook.weather;
import java.io.InputStream;
import org.sonatype.mavenbook.weather.model.Weather;
public class WeatherService {
private YahooRetriever yahooRetriever;
private YahooParser yahooParser;
public WeatherService() {}
public Weather retrieveForecast(String zip) throws Exception {
// Retrieve Data
InputStream dataIn = yahooRetriever.retrieve(zip);
// Parse DataS
Weather weather = yahooParser.parse(zip, dataIn);
return weather;
}
public YahooRetriever getYahooRetriever() {
return yahooRetriever;
}
public void setYahooRetriever(YahooRetriever yahooRetriever) {
this.yahooRetriever = yahooRetriever;
}
public YahooParser getYahooParser() {
return yahooParser;
}
public void setYahooParser(YahooParser yahooParser) {
this.yahooParser = yahooParser;
}
}
마지막으로 이 프로젝트에서 ApplicationContext 라고 하는 것을 만들기 위해 Spring 프레임워크에 의해 사용되는 XML 파일을 가진다. 먼저 몇가지 설명이 필요한데, 웹 어플리케이션과 명령행 유틸리티 모두는 WeatherService 클래스와 상호작용할 필요가 있으며, 모두 weatherService 라는 이름을 사용해서 Spring의 ApplicationContext 로부터 해당 클래스의 인스턴스를 조회함으로써 그와 같이 수행한다. 웹 어플리케이션은 WeatherService 인스턴스와 관련된 Spring MVC 컨트롤러를 사용하며, 명령행 유틸리티는 정적 main() 함수에 ApplicationContext로부터 WeatherService를 로딩한다. 재사용을 위해 src/main/resources에 applicationContext-weather.xml 파일을 포함시켰으며, 이는 클래스패스에서 사용 가능하다. simple-weather 모듈에 대한 의존관계를 가진 모듈들은 Spring 프레임워크의 ClasspathXmlApplicationContext를 사용해서 해당 어플리케이션 컨텍스트를 로딩할 수 있다. 그 다음에 weatherService로 명명된 WeatherService의 인스턴스를 참조할 수 있다. 예제 7-7을 참고하라.
예제 7-7. simple-weather 모듈에 대한 Spring의 ApplicationContext
<?xml version="1.0" encoding="UTF-8"?>
<beans xmlns="http://www.springframework.org/schema/beans"
xmlns:xsi="http://www.w3.org/2001/XMLSchema-instance"
xsi:schemaLocation="http://www.springframework.org/schema/beans
http://www.springframework.org/schema/beans/spring-beans-2.0.xsd
default-lazy-init="true">
<bean id="weatherService"
class="org.sonatype.mavenbook.weather.WeatherService">
<property name="yahooRetriever" ref="yahooRetriever"/>
<property name="yahooParser" ref="yahooParser"/>
</bean>
<bean id="yahooRetriever"
class="org.sonatype.mavenbook.weather.YahooRetriever"/>
<bean id="yahooParser"
class="org.sonatype.mavenbook.weather.YahooParser"/>
</beans>
위의 문서는 세가지 빈인 yahooParser, yahooRetriever, weatherService을 정의한다. weatherService 빈은 WeatherService의 인스턴스이며, 이 XML 문서는 해당 클래스의 명명된 인스턴스로의 참조를 가진 yahooParser와 yahooRetriever 속성을 사용한다. 이 applicationContext-weather.xml 파일을 이 다중 모듈 프로젝트의 하위 시스템의 구조를 정의하는 것으로 생각하라. simple-webapp와 simple-command와 같은 프로젝트들은 이 컨텍스트를 참조하고 YahooRetriever와 YahooParser의 인스턴스와 관계를 이미 가지는 WeatherService의 인스턴스를 가지고 온다.
7.5 Simple Persist 모듈
이 모듈은 두개의 매우 단순한 DAO(Data Access Object) 를 정의한다. DAO는 저장 오퍼레이션에 대한 인터페이스를 제공한다. Hibernate와 같은 객체-관계형 매핑(ORM) 프레임워크를 사용하는 어플리케이션에서 DAO는 객체주위에 보통 정의된다. 이 프로젝트에서 WeatherDAO와 LocationDAO의 두개의 DAO의 객체를 정의한다. WeatherDAO 클래스는 Weather 객체를 DB에 저장하고 id의 Weather 객체를 조회하고, 특정 위치와 일치하는 Weather를 조회한다. LocationDAO는 우편번호를 통해 Location 객체를 조회한다. 먼저, 예제 7-8의 simple-persist POM을 살펴보자.
예제 7-8. simple-persist POM
<project xmlns="http://maven.apache.org/POM/4.0.0"
xmlns:xsi="http://www.w3.org/2001/XMLSchema-instance"
xsi:schemaLocation="http://maven.apache.org/POM/4.0.0
http://maven.apache.org/maven-v4_0_0.xsd">
<modelVersion>4.0.0</modelVersion>
<parent>
<groupId>org.sonatype.mavenbook.ch07</groupId>
<artifactId>simple-parent</artifactId>
<version>1.0</version>
</parent>
<artifactId>simple-persist</artifactId>
<packaging>jar</packaging>
<name>Simple Persistence API</name>
<dependencies>
<dependency>
<groupId>org.sonatype.mavenbook.ch07</groupId>
<artifactId>simple-model</artifactId>
<version>1.0</version>
</dependency>
<dependency>
<groupId>org.hibernate</groupId>
<artifactId>hibernate</artifactId>
<version>3.2.5.ga</version>
<exclusions>
<exclusion>
<groupId>javax.transaction</groupId>
<artifactId>jta</artifactId>
</exclusion>
</exclusions>
</dependency>
<dependency>
<groupId>org.hibernate</groupId>
<artifactId>hibernate-annotations</artifactId>
<version>3.3.0.ga</version>
</dependency>
<dependency>
<groupId>org.hibernate</groupId>
<artifactId>hibernate-commons-annotations</artifactId>
<version>3.3.0.ga</version>
</dependency>
<dependency>
<groupId>org.apache.geronimo.specs</groupId>
<artifactId>geronimo-jta_1.1_spec</artifactId>
<version>1.1</version>
</dependency>
<dependency>
<groupId>org.springframework</groupId>
<artifactId>spring</artifactId>
<version>2.0.7</version>
</dependency>
</dependencies>
</project>
위의 POM 파일은 부모 POM으로 simple-parent를 참조하며, 몇가지 의존관계를 정의한다. simple-persist의 POM에 있는 의존관계들은 다음과 같다.
org.sonatype.mavenbook.ch07:simple-model:1.0
simple-weather 모듈과 같이 이 저장 모듈은 simple-model에 정의된 핵심 모델 객체를 참조한다.
org.hibernate:hibernate:3.2.5.ga
Hibernate 버전 3.2.5.ga에 대한 의존관계를 정의하지만, Hibernate에 대한 의존관계는 제외했음을 유의하라. javax.transaction:javax 의존관계가 공식 Maven 레파지토리에서 사용 가능하지 않기 때문에 이와 같이 했다. 이 의존관계는 Sun의 명세들에 대한 의존관계들이 아직 중앙 Maven 레파지토리에서 사용할 수 있기 때문에 그렇다. 이러한 Sun의 의존관계들에 대한 다운로딩시 메시지에 대한 번거로움을 피하기 위해서 Hibernate에서 이러한 의존관계를 제외하고 다음의 의존관계를 추가한다.
org.apache.geronimo.specs:geronimo-jta_1.1_spec:1.1
서블릿과 JSP API와 같이 Apache Geronimo 프로젝트는 Apache 라이선스 하에서 엔터프라이즈 API의 많은 인증된 버전들이 배포되기에 충분하다. 이는 JDBC, JNDI, JTA API들에 대한 의존관계를 컴포넌트에 추가할 때마다 org.apache.geronimo.specs groupId 밑에 있는 해당 라이브러리를 검색할 수 있음을 의미한다.
org.springframework:spring:2.0.7
이는 의존관계로 전체 Spring 프레임워크를 포함한다.
유의
사용하는 Spring의 컴포넌트만을 의존관계로 갖는 것이 보통 좋은 기법이다. Spring 프레임워크는 spring-hibernate3와 같이 특정 산출물들을 만들어내는데에 매우 효과적이다.
사용하는 Spring의 컴포넌트만을 의존관계로 갖는 것이 보통 좋은 기법이다. Spring 프레임워크는 spring-hibernate3와 같이 특정 산출물들을 만들어내는데에 매우 효과적이다.
왜 Spring에 대해 의존관계가 있는가? Hibernate 통합에 대해서 생각해볼 때 Spring은 HibernateDaoSupport 와 같은 헬퍼 클래스들을 제공한다. HibernateDaoSupport에서 제공하는 것에 대한 예제로 예제 7-9의 WeatherDAO에 대한 핵심 부분을 살펴보자.
예제 7-9. simple-persist의 WeatherDAO 클래스
package org.sonatype.mavenbook.weather.persist;
import java.util.ArrayList;
import java.util.List;
import org.hibernate.Query;
import org.hibernate.Session;
import org.springframework.orm.hibernate3.HibernateCallback;
import org.springframework.orm.hibernate3.support.HibernateDaoSupport;
import org.sonatype.mavenbook.weather.model.Location;
import org.sonatype.mavenbook.weather.model.Weather;
public class WeatherDAO extends HibernateDaoSupport<-- (1) {
public WeatherDAO() {}
public void save(Weather weather) {<-- (2)
getHibernateTemplate().save( weather );
}
public Weather load(Integer id) {<-- (3)
return (Weather) getHibernateTemplate().load( Weather.class, id);
}
@SuppressWarnings("unchecked")
public List<Weather> recentForLocation( final Location location ) {
return (List<Weather>) getHibernateTemplate().execute(
new HibernateCallback() {<-- (4)
public Object doInHibernate(Session session) {
Query query = getSession().getNamedQuery("Weather.byLocation");
query.setParameter("location", location);
return new ArrayList<Weather>( query.list() );
}
});
}
}
이상과 같다. 아니다. 실제적으로 새로운 행을 입력하고, PK로 조회하고, Location 테이블의 id와 조인하는 Weather의 모든 행을 검색하는 클래스를 작성해야 한다. 명확하게 Hibernate의 복잡함에 대해 이해시키기 위해서는 이 책에 500페이지를 넣어야 하지만, 다음과 같이 매우 간략한 설명을 할 것이다.
(1) 이 클래스는 HibernateDaoSupport 상속받고 있다. 이것이 의미하는 것은 해당 클래스가 Hibernate의 SessionFactory와 연관될 것이며, 이는 Hibernate의 Session 객체를 생성하는데 사용된다. Hibernate에서 모든 오퍼레이션은 Session 객체를 통해 수행한다. Session은 내부의 DB와의 연결을 조정하며 JDBC DataSource와의 연결 관리를 담당한다. HibernateDaoSupport를 상속받는 것 역시 getHibernateTemplate()을 사용해서 HibernateTemplate을 접근할 수 있음을 의미한다.
(2) save() 메소드는 Weather의 인스턴스를 가지고 HibernateTemplate의 save() 메소드를 호출한다. HibernateTemplate은 공통된 Hibernate 오퍼레이션에 대한 호출을 단순화시키며 DB에 특화된 예외를 실행시 예외로 변경한다. 위의 예제에서 save()를 호출하면, Weather테이블에 새로운 레코드를 입력한다. save() 대신 update()를 사용하면, 기존 행을 변경하며, saveOrUpdate()는 Weather의 id 속성이 null인지를 따져서 저장 혹은 변경을 수행한다.
(3) load() 메소드는 다시 한번 HibernateTemplate의 인스턴스의 해당 메소드를 단지 호출하는 한줄짜리 코드이다. HibernateTemplate의 load()는 Class 객체와 Serializable 객체를 파라미터로 받는다. 위의 경우, Serializable는 로딩할 Weather 객체의 id 값에 해당한다.
(4) 마지막 메소드인 recentForLocation() 는 Weather 모델 객체에 정의된 NamedQuery 를 호출한다. 이전의 예로 되돌아가서 살펴보면, Weather 모델 객체는 "from Weather w where w.location = :location" 의 쿼리인 Weather.byLocation 명명 쿼리를 정의했다. HibernateTemplate 의 execute() 메소드에 의해 실행되는 HibernateCallback 내의 Hibernate Session 객체로의 참조를 사용해서 이 NamedQuery 를 로딩하고 있다. 이 메소드에서 recentForLocation() 메소드에 넘겨진 파라미터와 같이 명명된 파라미터 위치를 꺼내는 것을 볼 수 있을 것이다.
이제 몇가지가 명확해졌을 것이다. HibernateDaoSupport와 HibernateTemplate은 Spring 프레임워크의 클래스들이다. Hibernate의 DAO 객체를 쉽게 작성하기 위해 Spring 프레임워크에 의해 생성되었다. 이 DAO를 지원하기 위해서 simple-persist 의 Spring ApplicationContext 정의에 몇가지 설정을 필요로 한다. 예제 7-10에 보여지는 XML 문서는 applicationContext-persist.xml라는 이름의 파일에 src/main/resources에 저장된다.
예제 7-10. simple-persist에 대한 Spring ApplicationContext
<beans xmlns="http://www.springframework.org/schema/beans"
xmlns:xsi="http://www.w3.org/2001/XMLSchema-instance"
xsi:schemaLocation="http://www.springframework.org/schema/beans
http://www.springframework.org/schema/beans/spring-beans-2.0.xsd"
default-lazy-init="true">
<bean id="sessionFactory" class="org.springframework.orm.hibernate3.annotation.AnnotationSessionFactoryBean">
<property name="annotatedClasses">
<list>
<value>org.sonatype.mavenbook.weather.model.Atmosphere</value>
<value>org.sonatype.mavenbook.weather.model.Condition</value>
<value>org.sonatype.mavenbook.weather.model.Location</value>
<value>org.sonatype.mavenbook.weather.model.Weather</value>
<value>org.sonatype.mavenbook.weather.model.Wind</value>
</list>
</property>
<property name="hibernateProperties">
<props>
<prop key="hibernate.show_sql">false</prop>
<prop key="hibernate.format_sql">true</prop>
<prop key="hibernate.transaction.factory_class">
org.hibernate.transaction.JDBCTransactionFactory
</prop>
<prop key="hibernate.dialect">
org.hibernate.dialect.HSQLDialect
</prop>
<prop key="hibernate.connection.pool_size">0</prop>
<prop key="hibernate.connection.driver_class">
org.hsqldb.jdbcDriver
</prop>
<prop key="hibernate.connection.url">
jdbc:hsqldb:data/weather;shutdown=true
</prop>
<prop key="hibernate.connection.username">sa</prop>
<prop key="hibernate.connection.password"></prop>
<prop key="hibernate.connection.autocommit">true</prop>
<prop key="hibernate.jdbc.batch_size">0</prop>
</props>
</property>
</bean>
<bean id="locationDAO"
class="org.sonatype.mavenbook.weather.persist.LocationDAO">
<property name="sessionFactory" ref="sessionFactory"/>
</bean>
<bean id="weatherDAO"
class="org.sonatype.mavenbook.weather.persist.WeatherDAO">
<property name="sessionFactory" ref="sessionFactory"/>
</bean>
</beans>
이 어플리케이션 컨텍스트에서 몇가지를 수행했다. sessionFactory 빈은 DAO가 Hibernate의 Session 객체를 가지고 오는 빈이다. 이 빈은 AnnotationSessionFactoryBean의 인스턴스이며 annotatedClasses의 목록 형태로 제공된다. 어노테이션이 있는 클래스의 목록은 simple-model 모듈에 정의된 클래스 목록임을 유의하라. 그 다음 sessionFactory는 몇가지 Hibernate 설정 속성 (hibernateProperties)들로 설정된다. 위의 예제에서 Hibernate 속성들은 다음과 같은 것들을 정의한다.
hibernate.dialect
이 세팅은 어떻게 SQL이 해당 DB에 대해 생성되는지를 관리한다. HSQLDB 를 사용하고 있기 때문에 DB dialect는 org.hibernate.dialect.HSQLDialect로 세팅된다. Hibernate는 Oracle, MySQL, Postgres, SQL Server와 같은 모든 주요 DB에 대해 dialect를 가지고 있다.
hibernate.connection.*
위의 예제에서 Spring 설정으로부터 JDBC 연결 속성을 설정하고 있다. 어플리케이션은 ./data/weather 디렉토리의 HSQLDB에 대해 실행하도록 설정된다. 실제 엔터프라이즈 환경에서 어플리케이션의 코드로부터 DB 설정을 없애기 위한 JNDI와 같은 것을 사용할 수도 있을 것이다.
마지막으로 이 빈 정의 파일에서 simple-persist의 DAO 객체 모두가 생성되며 방금 정의한 sessionFactory 빈에 대한 참조가 주어진다. simple-weather의 Spring 어플리케이션 컨텍스트와 같이 이 applicationContext-persist.xml 파일은 더 큰 전사 설계에서 하위 모듈의 아키텍처를 정의한다. 만일 더 큰 저장 클래스들을 가지고 작업하고 있다면, 어플리케이션과는 분리되는 어플리케이션 컨텍스트에 이러한 것들을 포함하는 것이 유용하다는 것을 발견할 것이다.
simple-persist 에서 마지막 퍼즐조각이 있다. 이장의 이후에 어노테이션이 있는 모델 객체로부터 DB 스키마를 생성하는 Maven Hibernate3 플러그인을 어떻게 사용하는지를 살펴볼 것이다. 이를 위해 동작을 올바로 하려면, Maven Hibernate3 플러그인은 JDBC 연결 설정 파라미터, 어노테이션이 있는 클래스 목록, src/main/resources에 hibernate.cfg.xml 라는 파일로부터 다른 Hibernate 설정 등을 읽을 필요가 있다. 이 파일(applicationContext-persist.xml 의 설정 일부분이 겹침)의 목적은 작성된 어노테이션으로부터 Maven Hibernate3 플러그인이 DDL을 생성하도록 만든다. 예제 7-11을 참고하라.
예제 7-11. simple-persist의 hibernate.cfg.xml
<!DOCTYPE hibernate-configuration PUBLIC
"-//Hibernate/Hibernate Configuration DTD 3.0//EN"
"http://hibernate.sourceforge.net/hibernate-configuration-3.0.dtd">
<hibernate-configuration>
<session-factory>
<!-- SQL dialect -->
<property name="dialect">org.hibernate.dialect.HSQLDialect</property>
<!-- Database connection settings -->
<property name="connection.driver_class">org.hsqldb.jdbcDriver</property>
<property name="connection.url">jdbc:hsqldb:data/weather</property>
<property name="connection.username">sa</property>
<property name="connection.password"></property>
<property name="connection.shutdown">true</property>
<!-- JDBC connection pool (use the built-in one) -->
<property name="connection.pool_size">1</property>
<!-- Enable Hibernate's automatic session context management -->
<property name="current_session_context_class">thread</property>
<!-- Disable the second-level cache -->
<property name="cache.provider_class">org.hibernate.cache.NoCacheProvider</property>
<!-- Echo all executed SQL to stdout -->
<property name="show_sql">true</property>
<!-- disable batching so HSQLDB will propagate errors correctly. -->
<property name="jdbc.batch_size">0</property>
<!-- List all the mapping documents we're using -->
<mapping class="org.sonatype.mavenbook.weather.model.Atmosphere"/>
<mapping class="org.sonatype.mavenbook.weather.model.Condition"/>
<mapping class="org.sonatype.mavenbook.weather.model.Location"/>
<mapping class="org.sonatype.mavenbook.weather.model.Weather"/>
<mapping class="org.sonatype.mavenbook.weather.model.Wind"/>
</session-factory>
</hibernate-configuration>
예제 7-10과 예제 7-11의 내용은 겹친다. Spring 어플리케이션 컨텍스트 XML은 웹 어플리케이션과 명령행 어플리케이션에 의해 사용되는 반면에, hibernate.cfg.xml는 메이븐의 Hibernate3 플러그인을 지원하는 용도로만 사용된다. 이장의 이후에 이 hibernate.cfg.xml 와 simple-model에 정의된 어노테이션이 있는 객체 모델을 기반으로 DB 스키마를 생성하는 Maven Hibernate3 플러그인을 어떻게 사용하는지를 살펴볼 것이다. hibernate.cfg.xml 파일은 JDBC 연결 속성을 설정하고 Maven Hibernate3 플러그인에 대해 어노테이션이 있는 모델 클래스의 목록을 나열하는 파일이다.
7.6 간단한 웹 어플리케이션 모듈
웹 어플리케이션은 simple-webapp 프로젝트에 정의된다. simple 웹 어플리케이션 프로젝트는 WeatherController과 HistoryController이라는 두개의 Spring MVC 컨트롤러를 정의하게 된다. 이 두개의 컨트롤러는 simple-weather와 simple-persist에 정의된 컴포넌트를 참조하게 된다. Spring 컨테이너는 simple-weather의 applicationContext-weather.xml 파일과 simple-persist의 applicationContext-persist.xml 파일을 참조하는 어플리케이션의 web.xml 에 설정된다. 이 간단한 웹 어플리케이션의 컴포넌트 아키텍처가 그림 7-3에 나타나 있다.
그림 7-3. simple-weather과 simple-persist의 컴포넌트를 참조하는 Spring MVC 컨트롤러
simple-webapp을 위한 POM이 예제 7-12에 나타난다.
예제 7-12. simple-webapp에 대한 POM
<project xmlns="http://maven.apache.org/POM/4.0.0"
xmlns:xsi="http://www.w3.org/2001/XMLSchema-instance"
xsi:schemaLocation="http://maven.apache.org/POM/4.0.0
http://maven.apache.org/maven-v4_0_0.xsd">
<modelVersion>4.0.0</modelVersion>
<parent>
<groupId>org.sonatype.mavenbook.ch07</groupId>
<artifactId>simple-parent</artifactId>
<version>1.0</version>
</parent>
<artifactId>simple-webapp</artifactId>
<packaging>war</packaging>
<name>Simple Web Application</name>
<dependencies>
<dependency> <-- (1)
<groupId>org.apache.geronimo.specs</groupId>
<artifactId>geronimo-servlet_2.4_spec</artifactId>
<version>1.1.1</version>
</dependency>
<dependency>
<groupId>org.sonatype.mavenbook.ch07</groupId>
<artifactId>simple-weather</artifactId>
<version>1.0</version>
</dependency>
<dependency>
<groupId>org.sonatype.mavenbook.ch07</groupId>
<artifactId>simple-persist</artifactId>
<version>1.0</version>
</dependency>
<dependency>
<groupId>org.springframework</groupId>
<artifactId>spring</artifactId>
<version>2.0.7</version>
</dependency>
<dependency>
<groupId>org.apache.velocity</groupId>
<artifactId>velocity</artifactId>
<version>1.5</version>
</dependency>
</dependencies>
<build>
<finalName>simple-webapp</finalName>
<plugins>
<plugin> <-- (2)
<groupId>org.mortbay.jetty</groupId>
<artifactId>maven-jetty-plugin</artifactId>
<dependencies> <-- (3)
<dependency>
<groupId>hsqldb</groupId>
<artifactId>hsqldb</artifactId>
<version>1.8.0.7</version>
</dependency> <-- (4)
</dependencies>
</plugin>
<plugin>
<groupId>org.codehaus.mojo</groupId> <-- (5)
<artifactId>hibernate3-maven-plugin</artifactId>
<version>2.0</version>
<configuration>
<components>
<component>
<name>hbm2ddl</name>
<implementation>annotationconfiguration</implementation> <-- (6)
</component>
</components>
</configuration>
<dependencies>
<dependency>
<groupId>hsqldb</groupId>
<artifactId>hsqldb</artifactId>
<version>1.8.0.7</version>
</dependency>
</dependencies>
</plugin>
</plugins>
</build>
</project>
이책이 진행함에 따라 그리고 예제가 점점 더 커짐에 따라 pom.xml이 어떤 무게를 가지기 시작함을 느낄 수 있을 것이다. 위의 POM에서 네개의 의존관계와 두개의 플러그인을 설정하고 있다. 이 POM을 세부적으로 살펴보고 몇가지 중요한 설정 부분에 대해 생각해보도록 하자.
(1) simple-webapp 프로젝트는 서블릿 2.4 명세, Apache Geronimo의 구현체, simple-weather 서비스 라이브러리, simple-persist 저장 라이브러리, 전체 Spring 프레임워크 2.0.7의 네개의 의존관계를 정의하고 있다.
(2) 빌드 설정에서 내장 HSQLDB 인스턴스에 접속하는 Maven Hibernate3 플러그인을 설정하고 있다. JDBC를 사용해서 이 DB에 성공적으로 접속하는 Maven Hibernate3 플러그인에 대해 플러그인은 클래스패스의 HSQLDB JDBC 드라이버를 참조할 필요가 있다. 의존관계를 플러그인에 대해 사용가능하게 하려면 확장으로 의존관계에 대한 참조를 추가한다. 확장을 플러그인 실행에 대한 클래스패스에 어떤 것을 추가하는 능력을 제공하는 것으로 생각할 수 있다. 이 경우 hsqldb:hsqldb:1.8.0.7를 참조하고 있다.
(3) Maven Jetty 플러그인은 위의 프로젝트에 추가하는 것만큼 더 쉽게 할 수는 없을 것이다. 적절한 groupId와 artifactId를 참조하는 plugin 요소를 단순히 추가한다. 이 플러그인이 설정하는데 너무 하찮은 것이라는 의미는 플러그인 개발자가 대부분의 경우에 변경할 필요가 없는 적합한 기본값을 제공하는 작업을 해주었다는 것을 뜻한다. 만일 Jetty 플러그인의 설정을 변경할 필요가 정말로 있다면 configuration 요소를 추가함으로써 그와 같이 할 수 있을 것이다.
(4) 빌드 설정에서 내장 HSQLDB 인스턴스를 접속하는 Maven Hibernate3 플러그인을 설정하고 있다. JDBC를 사용해서 이 DB에 성공적으로 접속하는 Maven Hibernate3 플러그인에 대해 플러그인은 클래스패스의 HSQLDB JDBC 드라이버를 참조할 필요가 있다. 의존관계를 플러그인에 대해 사용가능하게 하려면 <plugin> 선언 내에 바로 <dependency> 선언을 추가한다. 이 경우, hsqldb:hsqldb:1.8.0.7를 참조하고 있다. Hibernate 플러그인은 또한 DB를 생성하기 위한 JDBC 드라이버를 필요로 하고 있어서 설정에 이 의존관계 역시 추가했다.
(5) Maven Hibernate 플러그인 해당 POM이 시작할 때 작동하게 된다. 다음 절에서 HSQLDB DB를 생성하기 위해 hbm2ddl goal 을 실행할 것이다. 위의 pom.xml에서 Codehaus Mojo 플러그인에서 만든 hibernate3-maven-plugin 의 2.0 버전에 대한 참고를 포함하고 있다.
(6) Maven Hibernate3 플러그인은 Hibernate3 플러그인의 서로 다른 사용 시나리오에 적절한 Hibernate 매핑 정보를 획득하는 서로 다른 방법을 가진다. 만일 Hibernate 매핑 XML (.hbm.xml) 파일을 사용하고, hbm2java goal을 사용해서 모델 클래스들을 생성하고자 원한다면 configuration에 implementation을 세팅할 것이다. 만일 기존 DB에서 .hbm.xml 파일과 모델 클래스들을 만드는데 DB 역공학을 위해 Hibernate3 플러그인을 사용하려면, jdbcconfiguration의 implementation을 사용할 것이다. 이 경우, DB를 생성하기 위해 기존 어노테이션이 있는 객체 모델을 사용하면 된다. 즉, Hibernate 매핑을 가지고 있지만, 아직 DB는 가지고 있지 않다. 이러한 사용 시나리오에서 적절한 implementation 값은 annotationconfiguration 이다. Maven Hibernate3 플러그인은 이후 7.7 절에서 더 상세하게 설명한다.
유의
일반적인 실수가 플러그인에 의해 필요한 의존관계를 추가하는데 <extensions> 설정을 사용한다는 것이다. 이는 매우 피해야 하는 상황인데, 확장은 프로젝트 간, 다른 성가신 부수효과 간의 클래스패스 오염을 유발시킬 수 있기 때문이다. 추가로 <extensions> 행위는 2.1에서 재작업되고 있는데, 따라서 어떠한 경우든 결국 변경할 필요가 있을 것이다. 오로지 <extensions> 대한 일반적인 사용은 새로운 wagon 구현을 정의하는 것이다.
일반적인 실수가 플러그인에 의해 필요한 의존관계를 추가하는데 <extensions> 설정을 사용한다는 것이다. 이는 매우 피해야 하는 상황인데, 확장은 프로젝트 간, 다른 성가신 부수효과 간의 클래스패스 오염을 유발시킬 수 있기 때문이다. 추가로 <extensions> 행위는 2.1에서 재작업되고 있는데, 따라서 어떠한 경우든 결국 변경할 필요가 있을 것이다. 오로지 <extensions> 대한 일반적인 사용은 새로운 wagon 구현을 정의하는 것이다.
다음은 모든 요청을 처리하는 두개의 Spring MVC 컨트롤러로 관심을 옮긴다 이 두개의 컨트롤러는 simple-weather와 simple-persist에 정의된 빈을 참조하고 있다. 예제 7-13을 참고하라.
예제 7-13. simple-webapp 의 WeatherController
package org.sonatype.mavenbook.web;
import org.sonatype.mavenbook.weather.model.Weather;
import org.sonatype.mavenbook.weather.persist.WeatherDAO;
import org.sonatype.mavenbook.weather.WeatherService;
import javax.servlet.http.*;
import org.springframework.web.servlet.ModelAndView;
import org.springframework.web.servlet.mvc.Controller;
public class WeatherController implements Controller {
private WeatherService weatherService;
private WeatherDAO weatherDAO;
public ModelAndView handleRequest(HttpServletRequest request,
HttpServletResponse response) throws Exception {
String zip = request.getParameter("zip");
Weather weather = weatherService.retrieveForecast(zip);
weatherDAO.save(weather);
return new ModelAndView("weather", "weather", weather);
}
public WeatherService getWeatherService() {
return weatherService;
}
public void setWeatherService(WeatherService weatherService) {
this.weatherService = weatherService;
}
public WeatherDAO getWeatherDAO() {
return weatherDAO;
}
public void setWeatherDAO(WeatherDAO weatherDAO) {
this.weatherDAO = weatherDAO;
}
}
WeatherController는 예제에 나타난 시그너처를 사용해 handleRequest() 메소드를 구현하도록 하는 Spring MVC의 Controller 인터페이스를 구현하고 있다. 만일 이 메소드의 본질을 보려면, weatherService 인스턴스 변수의 retrieveForecast() 메소드를 호출하는 것을 볼 수 있을 것이다. WeatherService 클래스를 인스턴스화 시키는 서블릿을 가지는 이전 장과 달리, WeatherController는 weatherService 속성을 가진 빈이다. Spring IoC 컨테이너는 weatherService 컴포넌트에 컨트롤러를 엮는(wiring) 것을 담당하고 있다. 또한 이 Spring 컨트롤러 구현에서 WeatherFormatter를 사용하고 있지 않음을 유의하라. 대신에 ModelAndView의 생성자에게 retrieveForecast()에 의해 반환되는 Weather객체를 넘기고 있다. ModelAndView클래스는 Velocity 템플릿을 사용하게 되며, 이 템플릿은 ${weather} 변수에 대한 참조를 가진다. weather.vm 템플릿은 src/main/webapp/WEB-INF/vm에 저장되며 예제 7-14에 나타난다.
WeatherController에서 예상날씨를 출력하기 전에 WeatherService로부터 반환받은 Weather객체를 WeatherDAO의 save() 메소드로 넘긴다. 여기서 Hibernate를 사용해서 HSQLDB에 Weather객체를 저장한다. 나중에 HistoryController에서 WeatherController가 저장했던 날씨 예상에 관한 이력을 어떻게 조회할 수 있는지를 살펴볼 것이다.
예제 7-14. WeatherController 에서 호출하는 weather.vm 템플릿
<b>Current Weather Conditions for:
${weather.location.city}, ${weather.location.region},
${weather.location.country}</b><br/>
<ul>
<li>Temperature: ${weather.condition.temp}</li>
<li>Condition: ${weather.condition.text}</li>
<li>Humidity: ${weather.atmosphere.humidity}</li>
<li>Wind Chill: ${weather.wind.chill}</li>
<li>Date: ${weather.date}</li>
</ul>
Velocity 템플릿의 문법은 직관적이다. 변수는 ${} 표기를 사용해서 참조된다. 중괄화 사이의 표현식은 WeatherController에 의해 해당 템플릿으로 넘겨진 weather 변수의 속성, 혹은 속성의 속성을 참조한다.
HistoryController는 WeatherController에 의해 요청되었던 최근 날씨정보를 조회하는데 사용된다. WeatherController로부터 날씨정보를 조회할때마다 해당 컨트롤러는 WeatherDAO를 통해 DB에 Weather 객체를 저장한다. WeatherDAO는 그 다음에 관련 DB 테이블들의 여러 행들에 Weather 객체를 분해하기 위해 Hibernate를 사용한다. HistoryController는 예제 7-15에 보여진다.
예제 7-15. simple-web의 HistoryController
package org.sonatype.mavenbook.web;
import java.util.*;
import javax.servlet.http.*;
import org.springframework.web.servlet.ModelAndView;
import org.springframework.web.servlet.mvc.Controller;
import org.sonatype.mavenbook.weather.model.*;
import org.sonatype.mavenbook.weather.persist.*;
public class HistoryController implements Controller {
private LocationDAO locationDAO;
private WeatherDAO weatherDAO;
public ModelAndView handleRequest(HttpServletRequest request,
HttpServletResponse response) throws Exception {
String zip = request.getParameter("zip");
Location location = locationDAO.findByZip(zip);
List<Weather> weathers = weatherDAO.recentForLocation( location );
Map<String,Object> model = new HashMap<String,Object>();
model.put( "location", location );
model.put( "weathers", weathers );
return new ModelAndView("history", model);
}
public WeatherDAO getWeatherDAO() {
return weatherDAO;
}
public void setWeatherDAO(WeatherDAO weatherDAO) {
this.weatherDAO = weatherDAO;
}
public LocationDAO getLocationDAO() {
return locationDAO;
}
public void setLocationDAO(LocationDAO locationDAO) {
this.locationDAO = locationDAO;
}
}
HistoryController는 simple-persist에 정의된 두개의 DAO 객체에 엮여져있다. DAO는 HistoryController의 빈 속석으로 WeatherDAO와 LocationDAO이다. HistoryController의 목적은 우편번호 파라미터에 대응하는 Weather 객체의 List를 조회하는 것이다. WeatherDAO가 DB에 Weather 객체를 저장할 때 우편번호만을 저장하지 않는다. simple-model의 Weather 객체와 관련된 Location 객체를 저장한다. Weather 객체의 List를 조회하려면 HistoryController는 먼저 우편번호 파라미터에 해당하는 Location 객체르 조회한다. 이는 LocationDAO의 findByZip() 메소드를 호출함으로써 수행한다.
일단 Location 객체가 조회되었다면, 그 다음에 HistoryController 는 주어진 Location과 일치하는 최근의 Weather 객체들을 조회하려고 할 것이다. 일단 List<Weather>가 조회되었다면, HashMap이 예제 7-16에 보여지는 history.vm Velocity 템플릿에 대한 두개의 변수를 담기 위해 생성된다.
예제 7-16. HistoryController에 의해 사용되는 history.vm
<b>
Weather History for: ${location.city}, ${location.region}, ${location.country}
</b>
<br/>
#foreach( $weather in $weathers )
<ul>
<li>Temperature: $weather.condition.temp</li>
<li>Condition: $weather.condition.text</li>
<li>Humidity: $weather.atmosphere.humidity</li>
<li>Wind Chill: $weather.wind.chill</li>
<li>Date: $weather.date</li>
</ul>
#end
src/main/webapp/WEB-INF/vm 에 있는 history.vm 템플릿은 WeatherDAO에 의해서 조회되는 날씨 정보의 위치에 대한 정보를 출력하기 위해 location 변수를 참조한다. 이 템플릿은 그 다음에 weathers 변수의 각 요소를 접근하는 접근하기 위해 Velocity 제어 구조인 #foreach를 사용한다. weathers의 각 요소는 weather라는 이름의 변수에 할당되며, #foreach와 #end 사이의 템플릿은 각 날씨정보에 대해 조회한다.
이러한 Controller 구현에 대해서 이미 보았고, simple-weather와 simple-persist에 정의된 다른 빈들을 참조하는 것을 보았다. 이들은 HTTP 요청에 대해 응답하고, Velocity 템플릿을 사용하는 방법을 아는 템플릿 시스템으로 제어를 이양한다. 모든 이러한 내용은 src/main/webapp/WEB-INF/weather-servlet.xml 에 있는 Spring의 어플리케이션 컨텍스트에서 설정된다. ServletContextListener에 의해 로딩되며, 클래스패스로부터 applicationContext-weather.xml과 applicationContext-persist.xml를 로딩하기 위해 또한 설정된다. 예제 7-17에 있는 weather-servlet.xml을 더 자세하게 살펴보자.
예제 7-17. Spring 컨트롤러 설정 weather-servlet.xml
<beans>
<bean id="weatherController" <-- (1)
class="org.sonatype.mavenbook.web.WeatherController">
<property name="weatherService" ref="weatherService"/>
<property name="weatherDAO" ref="weatherDAO"/>
</bean>
<bean id="historyController"
class="org.sonatype.mavenbook.web.HistoryController">
<property name="weatherDAO" ref="weatherDAO"/>
<property name="locationDAO" ref="locationDAO"/>
</bean>
<!-- you can have more than one handler defined -->
<bean id="urlMapping"
class="org.springframework.web.servlet.handler.SimpleUrlHandlerMapping">
<property name="urlMap">
<map>
<entry key="/weather.x"> <-- (2)
<ref bean="weatherController" />
</entry>
<entry key="/history.x">
<ref bean="historyController" />
</entry>
</map>
</property>
</bean>
<bean id="velocityConfig" <-- (3)
class="org.springframework.web.servlet.view.velocity.VelocityConfigurer">
<property name="resourceLoaderPath" value="/WEB-INF/vm/"/>
</bean>
<bean id="viewResolver" <-- (4)
class="org.springframework.web.servlet.view.velocity.VelocityViewResolver">
<property name="cache" value="true"/>
<property name="prefix" value=""/>
<property name="suffix" value=".vm"/>
<property name="exposeSpringMacroHelpers" value="true"/>
</bean>
</beans>
(1) weather-servlet.xml 은 Spring 관리 빈으로 두개의 컨트롤러를 정의한다. weatherController는 weatherService와 weatherDAO로 참조하는 두개의 속성을 가진다. historyController는 weatherDAO와 locationDAO 빈을 참조한다. ApplicationContext가 생성될 때 simple-persist와 simple-weather 모두에서 정의된 ApplicationContexts로 접근을 하는 환경에서 생성된다. 예제 7-18에서 Spring이 어떻게 여러 Spring 설정 파일로부터 컴포넌트들을 병합하기 위해 설정되는지를 살펴볼 수 있다.
(2) urlMapping 빈은 WeatherController와 HistoryController를 호출하는 URL 패턴을 정의한다. 위의 예제에서 SimpleUrlHandlerMapping을 사용하고 /weather.x을 WeatherController로 그리고 /history.x를 HistoryController로 매핑하고 있다.
(3) Velocity 템플릿 엔진을 사용하고 있기 때문에 몇가지 설정 옵션을 넘길 필요가 있다. velocityConfig 빈에서 Velocity에게 /WEB-INF/vm 디렉토리에서 모든 템플릿들을 찾도록 전달하고 있다.
(4) 마지막으로 viewResolver는 VelocityViewResolver 클래스와 같이 설정된다. JSP나 JSTL(JavaServer Pages Standard Tag Library) 페이지를 처리하는 표준 ViewResolver에서 FreeMarker 템플릿을 처리할 수 있는 resolver로 Spring에는 수많은 ViewResolver 구현체들이 있다. 위의 예제에서 Velocity 템플릿 엔진을 설정하고 ModelAndView로 넘기는 해당 템플릿의 이름으로 자동으로 추가되는 기본 접두어 및 접미어를 세팅하고 있다.
따라서, simple-webapp 프로젝트는 웹 어플리케이션에 대한 기본적인 설정을 제공하는 web.xml 이었다. web.xml는 예제 7-18에 나타난다.
예제 7-18. simple-webapp 에 대한 web.xml
<web-app id="simple-webapp" version="2.4"
xmlns="http://java.sun.com/xml/ns/j2ee"
xmlns:xsi="http://www.w3.org/2001/XMLSchema-instance"
xsi:schemaLocation="http://java.sun.com/xml/ns/j2ee
http://java.sun.com/xml/ns/j2ee/web-app_2_4.xsd">
<display-name>Simple Web Application</display-name>
<context-param> <-- (1)
<param-name>contextConfigLocation</param-name>
<param-value>
classpath:applicationContext-weather.xml
classpath:applicationContext-persist.xml
</param-value>
</context-param>
<context-param> <-- (2)
<param-name>log4jConfigLocation</param-name>
<param-value>/WEB-INF/log4j.properties</param-value>
</context-param>
<listener> <-- (3)
<listener-class>
org.springframework.web.util.Log4jConfigListener
</listener-class>
</listener>
<listener>
<listener-class> <-- (4)
org.springframework.web.context.ContextLoaderListener
</listener-class>
</listener>
<servlet> <-- (5)
<servlet-name>weather</servlet-name>
<servlet-class>
org.springframework.web.servlet.DispatcherServlet
</servlet-class>
<load-on-startup>1</load-on-startup>
</servlet>
<servlet-mapping> <-- (6)
<servlet-name>weather</servlet-name>
<url-pattern>*.x</url-pattern>
</servlet-mapping>
</web-app>
(1) 여기서 이 프로젝트에서 applicationContext-weather.xml과 applicationContext-persist.xml을 재사용할 수 있는 약간의 마술이 있다. contextConfigLocation은 ApplicationContext을 생성하기 위해 ContextLoaderListener에 의해 사용된다. weather 서블릿이 생성될 때, 예제 7-17의 weather-servlet.xml은 이 contextConfigLocation로부터 생성된 ApplicationContext와 같이 사용될 것이다. 이러한 방법으로 또 다른 프로젝트에서 빈들을 정으할 수 있고 클래스패스를 통해 이러한 빈들을 참조할 수 있다. simple-persist와 simple-weather JAR들이 WEB-INF/lib에 위치할 것이기 때문에 해당 파일들을 참조하는 classpath:접두어를 사용하기만 하면 된다. (또 다른 방법은 해당 파일들을 /WEB-INF에 복사하고 /WEB-INF/applicationContext-persist.xml와 같은 방식으로 참조하는 것이다.)
(2) log4jConfigLocation은 Log4J 로깅 설정을 검색하는 Log4JConfigListener에 전달하는데 사용된다. 위의 예제에서 /WEB-INF/log4j.properties에서 검색하도록 Log4J에게 전달하고 있다.
(3) 웹 어플리케이션이 시작할 때 Log4J 시스템이 설정됨을 보장한다. ContextLoaderListener 이전에 Log4JConfigListener를 넣는 것이 중요하다. 그렇지 않으면 어플리케이션 기동을 막는 문제를 집어내는 중요한 로깅 메시지를 놓칠 수도 있다. 특히 많은 양의 빈들이 Spring에 의해서 관리되고 이 빈들 중 하나가 어플리케이션 기동에서 놓치게 되는 일이 발생하면 어플리케이션은 실패할 것이다. Spring이 시작하기 전에 초기의 로깅을 남긴다면 경고나 에러를 포착할 수 있는 기회를 가질 것이다. Spring이 시작하기전에 초기에 로깅을 남기지 못한다면 왜 어플리케이션이 기동하지 못했는지에 대한 아무런 내용을 알지 못할 것이다.
(4) ContextLoaderListener는 기본적으로 Spring 컨테이너이다. 어플리케이션이 시작할 때 이 리스너는 contextConfigLocation 파라미터로부터 ApplicationContext를 생성하게 된다.
(5) weather라는 이름을 가진 Spring MVC인 DispatcherServlet를 정의한다. 이것은 Spring에게 /WEB-INF/weather-servlet.xml에서 Spring 설정 파일을 찾도록 한다. 필요한 만큼 많은 DispatcherServlet를 선언할 수 있다. DispatcherServlet은 하나 이상의 Spring MVC 컨트롤로 구현체를 포함할 수 있다.
(6) .x로 끝나는 모든 요청은 weather 서블릿으로 보내진다. .x 확장자는 아무런 의미가 없음을 유의하라. 임의의 값을 사용했으며 선호하는 URL 패턴을 사용할 수 있다.
7.7 웹 어플리케이션 실행
웹 어플리케이션을 실행하려면 먼저 Hibernate3 플러그인을 사용해서 DB를 만들어야 한다. 이렇게 하기 위해 simple-webapp 프로젝트 디렉토리에서 다음을 실행한다.
$ mvn hibernate3:hbm2ddl
[INFO] Scanning for projects...
[INFO] Searching repository for plugin with prefix: 'hibernate3'.
[INFO] org.codehaus.mojo: checking for updates from central
[INFO] -------------------------------------------------------------
[INFO] Building Chapter 7 Simple Web Application
[INFO] task-segment: [hibernate3:hbm2ddl]
[INFO] -------------------------------------------------------------
[INFO] Preparing hibernate3:hbm2ddl
...
10:24:56,151 INFO org.hibernate.tool.hbm2ddl.SchemaExport - schema\
export complete
[INFO] -------------------------------------------------------------
[INFO] BUILD SUCCESSFUL
[INFO] -------------------------------------------------------------
이와 같이 실행하고 나면 HSQLDB DB를 포함하는 ${basedir}/data 디렉토리가 있을 것이다. 그 다음에 웹 어플리케이션을 다음과 같이 실행할 수 있다.
$ mvn jetty:run
[INFO] Scanning for projects...
[INFO] Searching repository for plugin with prefix: 'jetty'.
[INFO] ---------------------------------------------------------------
[INFO] Building Chapter 7 Simple Web Application
[INFO] task-segment: [jetty:run]
[INFO] ---------------------------------------------------------------
[INFO] Preparing jetty:run
...
[INFO] [jetty:run]
[INFO] Configuring Jetty for project: Chapter 7 Simple Web Application
...
[INFO] Context path = /simple-webapp
[INFO] Tmp directory = determined at runtime
[INFO] Web defaults = org/mortbay/jetty/webapp/webdefault.xml
[INFO] Web overrides = none
[INFO] Starting jetty 6.1.7 ...
2008-03-25 10:28:03.639::INFO: jetty-6.1.7
...
2147 INFO DispatcherServlet - FrameworkServlet 'weather':
initialization completed in 1654 ms
2008-03-25 10:28:06.341::INFO:
Started SelectChannelConnector@0.0.0.0:8080
[INFO] Started Jetty Server
일단 Jetty가 시작되면, http://localhost:8080/simple-webapp/weather.x?zip=60202 를 접속할 수 있으며, 웹 브라우저에서 일리노이즈 주의 에반스톤의 날씨를 볼 수 있다. 우편번호를 바꾸면 해당 지역의 날씨정보를 볼 수 있을 것이다.
Current Weather Conditions for: Evanston, IL, US
* Temperature: 42
* Condition: Partly Cloudy
* Humidity: 55
* Wind Chill: 34
* Date: Tue Mar 25 10:29:45 CDT 2008
* Temperature: 42
* Condition: Partly Cloudy
* Humidity: 55
* Wind Chill: 34
* Date: Tue Mar 25 10:29:45 CDT 2008
7.8 simple-command 모듈
simple-command 프로젝트는 simple-webapp의 명령행 버전이다. 동일한 의존관계인 simple-persist와 simple-weather에 의존하고 있는 유틸리티이다. 웹 브라우저를 통해 해당 어플리케이션과 상호작용하는 대신에 명령행에서 simple-command 유틸리티를 실행하게 된다. 그림 7-4와 예제 7-19를 참고하라.
그림 7-4. simple-command 모듈
예제 7-19. simple-command에 대한 POM
<project xmlns="http://maven.apache.org/POM/4.0.0"
xmlns:xsi="http://www.w3.org/2001/XMLSchema-instance"
xsi:schemaLocation="http://maven.apache.org/POM/4.0.0
http://maven.apache.org/maven-v4_0_0.xsd">
<modelVersion>4.0.0</modelVersion>
<parent>
<groupId>org.sonatype.mavenbook.ch07</groupId>
<artifactId>simple-parent</artifactId>
<version>1.0</version>
</parent>
<artifactId>simple-command</artifactId>
<packaging>jar</packaging>
<name>Simple Command Line Tool</name>
<build>
<finalName>${project.artifactId}</finalName>
<plugins>
<plugin>
<groupId>org.apache.maven.plugins</groupId>
<artifactId>maven-compiler-plugin</artifactId>
<configuration>
<source>1.5</source>
<target>1.5</target>
</configuration>
</plugin>
<plugin>
<groupId>org.apache.maven.plugins</groupId>
<artifactId>maven-surefire-plugin</artifactId>
<configuration>
<testFailureIgnore>true</testFailureIgnore>
</configuration>
</plugin>
<plugin>
<artifactId>maven-assembly-plugin</artifactId>
<configuration>
<descriptorRefs>
<descriptorRef>jar-with-dependencies</descriptorRef>
</descriptorRefs>
</configuration>
</plugin>
<plugin>
<groupId>org.codehaus.mojo</groupId>
<artifactId>hibernate3-maven-plugin</artifactId>
<version>2.1</version>
<configuration>
<components>
<component>
<name>hbm2ddl</name>
<implementation>annotationconfiguration</implementation>
</component>
</components>
</configuration>
<dependencies>
<dependency>
<groupId>hsqldb</groupId>
<artifactId>hsqldb</artifactId>
<version>1.8.0.7</version>
</dependency>
</dependencies>
</plugin>
</plugins>
</build>
<dependencies>
<dependency>
<groupId>org.sonatype.mavenbook.ch07</groupId>
<artifactId>simple-weather</artifactId>
<version>1.0</version>
</dependency>
<dependency>
<groupId>org.sonatype.mavenbook.ch07</groupId>
<artifactId>simple-persist</artifactId>
<version>1.0</version>
</dependency>
<dependency>
<groupId>org.springframework</groupId>
<artifactId>spring</artifactId>
<version>2.0.7</version>
</dependency>
<dependency>
<groupId>hsqldb</groupId>
<artifactId>hsqldb</artifactId>
<version>1.8.0.7</version>
</dependency>
</dependencies>
</project>
위의 POM은 예제 7-20에 나타난 org.sonatype.mavenbook.weather.Main 클래스를 포함하는 JAR 파일을 생성한다. 해당 POM에서 빌드하는 프로젝트로부터의 바이트코드와 모든 의존관계 바이트코드를 포함하여 프로젝트가 실행하는데 필요한 모든 바이트코드를 포함하는 단일 JAR 파일을 생성하는 jar-with-dependencies라는 이름의 내장 어셈블리 디스크립터를 사용하는 Maven Assembly 플러그인을 설정한다.
예제 7-20. simple-command에 대한 Main 클래스
package org.sonatype.mavenbook.weather;
import java.util.List;
import org.apache.log4j.PropertyConfigurator;
import org.springframework.context.ApplicationContext;
import org.springframework.context.support.ClassPathXmlApplicationContext;
import org.sonatype.mavenbook.weather.model.Location;
import org.sonatype.mavenbook.weather.model.Weather;
import org.sonatype.mavenbook.weather.persist.LocationDAO;
import org.sonatype.mavenbook.weather.persist.WeatherDAO;
public class Main {
private WeatherService weatherService;
private WeatherDAO weatherDAO;
private LocationDAO locationDAO;
public static void main(String[] args) throws Exception {
// Configure Log4J
PropertyConfigurator.configure(Main.class.getClassLoader().getResource(
"log4j.properties"));
// Read the Zip Code from the Command-line (if none supplied, use 60202)
String zipcode = "60202";
try {
zipcode = args[0];
} catch (Exception e) {
}
// Read the Operation from the Command-line (if none supplied use weather)
String operation = "weather";
try {
operation = args[1];
} catch (Exception e) {
}
// Start the program
Main main = new Main(zipcode);
ApplicationContext context =
new ClassPathXmlApplicationContext(
new String[] { "classpath:applicationContext-weather.xml",
"classpath:applicationContext-persist.xml" });
main.weatherService = (WeatherService) context.getBean("weatherService");
main.locationDAO = (LocationDAO) context.getBean("locationDAO");
main.weatherDAO = (WeatherDAO) context.getBean("weatherDAO");
if( operation.equals("weather")) {
main.getWeather();
} else {
main.getHistory();
}
}
private String zip;
public Main(String zip) {
this.zip = zip;
}
public void getWeather() throws Exception {
Weather weather = weatherService.retrieveForecast(zip);
weatherDAO.save( weather );
System.out.print(new WeatherFormatter().formatWeather(weather));
}
public void getHistory() throws Exception {
Location location = locationDAO.findByZip(zip);
List<Weather> weathers = weatherDAO.recentForLocation(location);
System.out.print(new WeatherFormatter().formatHistory(location, weathers));
}
}
Main 클래스는 WeatherDAO, LocationDAO, WeatherService 를 참조한다. 이 클래스의 정적 main() 메소드는
- 첫번째 명령행 인자로부터 우편번호를 읽는다.
- 두번째 명령행 인자로부터 operation을 읽는다. 만일 operation인 “weather”이면 가장 최근의 날씨가 웹 서비스로부터 조회한다. 만일 operation이 “history”이면, 프로그램은 로컬 DB에서 이력으로 관리되는 날씨 정보를 조회한다.
- simple-persist와 simple-weather로부터 로딩되는 두개의 XML 파일을 사용해서 Spring의 ApplicationContext 를 로딩한다.
- Main의 인스턴스를 생성한다.
- Spring의 ApplicationContext로부터 빈들과 같이 weatherService, weatherDAO, locationDAO를 꺼낸다.
- 지정된 operation에 따라서 적절한 메소드인 getWeather()나 getHistory()를 실행한다.
웹 어플리케이션에서 Velocity 템플릿을 로딩하는 Spring의 VelocityViewResolver를 사용했다. 독립 구현체에서는 Velocity 템플릿을 가지고 날씨 데이터를 로딩하는 간단한 클래스를 작성할 필요가 있다. 예제 7-21은 날씨 보고와 날씨 이력을 조회하는 두개의 메소드를 가진 클래스인 WeatherFormatter의 내용이다.
예제 7-21. Velocity 템플릿을 사용하는 날씨 데이터를 조회하는 WeatherFormatter
package org.sonatype.mavenbook.weather;
import java.io.InputStreamReader;
import java.io.Reader;
import java.io.StringWriter;
import java.util.List;
import org.apache.log4j.Logger;
import org.apache.velocity.VelocityContext;
import org.apache.velocity.app.Velocity;
import org.sonatype.mavenbook.weather.model.Location;
import org.sonatype.mavenbook.weather.model.Weather;
public class WeatherFormatter {
private static Logger log = Logger.getLogger(WeatherFormatter.class);
public String formatWeather( Weather weather ) throws Exception {
log.info( "Formatting Weather Data" );
Reader reader =
new InputStreamReader( getClass().getClassLoader().
getResourceAsStream("weather.vm"));
VelocityContext context = new VelocityContext();
context.put("weather", weather );
StringWriter writer = new StringWriter();
Velocity.evaluate(context, writer, "", reader);
return writer.toString();
}
public String formatHistory( Location location, List<Weather> weathers )
throws Exception {
log.info( "Formatting History Data" );
Reader reader =
new InputStreamReader( getClass().getClassLoader().
getResourceAsStream("history.vm"));
VelocityContext context = new VelocityContext();
context.put("location", location );
context.put("weathers", weathers );
StringWriter writer = new StringWriter();
Velocity.evaluate(context, writer, "", reader);
return writer.toString();
}
}
weather.vm 템플릿은 예제 7-22에 나타난 바와 같이 우편번호의 도시, 국가, 지역 뿐만 아니라 현재 온도를 단순히 보여준다. history.vm 템플릿은 지역을 보여주고 그 다음에 예제 7-23에 나타난 바와 같이 로컬 DB에 저장된 날씨 정보들을 반복한다. 이 템플릿 모두 ${basedir}/src/main/resources에 있다.
예제 7-22. weather.vm Velocity 템플릿
****************************************
Current Weather Conditions for:
${weather.location.city},
${weather.location.region},
${weather.location.country}
****************************************
* Temperature: ${weather.condition.temp}
* Condition: ${weather.condition.text}
* Humidity: ${weather.atmosphere.humidity}
* Wind Chill: ${weather.wind.chill}
* Date: ${weather.date}
예제 7-23. history.vm Velocity 템플릿
Weather History for:
${location.city},
${location.region},
${location.country}
#foreach( $weather in $weathers )
****************************************
* Temperature: $weather.condition.temp
* Condition: $weather.condition.text
* Humidity: $weather.atmosphere.humidity
* Wind Chill: $weather.wind.chill
* Date: $weather.date
#end
7.9 simple-command 실행
simple-command 프로젝트는 프로젝트의 바이트코드와 의존관계의 모든 바이트코드를 포함하는 단일 JAR를 생성하도록 설정된다. 이 어셈블리를 생성하려면, simple-command 프로젝트 디렉토로부터 Maven Assembly 플러그인의 assembly goal을 실행한다.
$ mvn assembly:assembly
[INFO] ------------------------------------------------------------------------
[INFO] Building Chapter 7 Simple Command Line Tool
[INFO] task-segment: [assembly:assembly] (aggregator-style)
[INFO] ------------------------------------------------------------------------
[INFO] [resources:resources]
[INFO] Using default encoding to copy filtered resources.
[INFO] [compiler:compile]
[INFO] Nothing to compile - all classes are up to date
[INFO] [resources:testResources]
[INFO] Using default encoding to copy filtered resources.
[INFO] [compiler:testCompile]
[INFO] Nothing to compile - all classes are up to date
[INFO] [surefire:test]
...
[INFO] [jar:jar]
[INFO] Building jar: .../simple-parent/simple-command/target/simple-command.jar
[INFO] [assembly:assembly]
[INFO] Processing DependencySet (output=)
[INFO] Expanding: .../.m2/repository/.../simple-weather-1-SNAPSHOT.jar into \
/tmp/archived-file-set.93251505.tmp
[INFO] Expanding: .../.m2/repository/.../simple-model-1-SNAPSHOT.jar into \
/tmp/archived-file-set.2012480870.tmp
[INFO] Expanding: .../.m2/repository/../hibernate-3.2.5.ga.jar into \
/tmp/archived-file-set.1296516202.tmp
... skipping 25 lines of dependency unpacking ...
[INFO] Expanding: .../.m2/repository/.../velocity-1.5.jar into \
/tmp/archived-file-set.379482226.tmp
[INFO] Expanding: .../.m2/repository/.../commons-lang-2.1.jar into \
/tmp/archived-file-set.1329200163.tmp
[INFO] Expanding: .../.m2/repository/.../oro-2.0.8.jar into \
/tmp/archived-file-set.1993155327.tmp
[INFO] Building jar: .../simple-parent/simple-command/target/\
simple-command-jar-with-dependencies.jar
[INFO] ------------------------------------------------------------------------
[INFO] Building Chapter 7 Simple Command Line Tool
[INFO] task-segment: [assembly:assembly] (aggregator-style)
[INFO] ------------------------------------------------------------------------
[INFO] [resources:resources]
[INFO] Using default encoding to copy filtered resources.
[INFO] [compiler:compile]
[INFO] Nothing to compile - all classes are up to date
[INFO] [resources:testResources]
[INFO] Using default encoding to copy filtered resources.
[INFO] [compiler:testCompile]
[INFO] Nothing to compile - all classes are up to date
[INFO] [surefire:test]
...
[INFO] [jar:jar]
[INFO] Building jar: .../simple-parent/simple-command/target/simple-command.jar
[INFO] [assembly:assembly]
[INFO] Processing DependencySet (output=)
[INFO] Expanding: .../.m2/repository/.../simple-weather-1-SNAPSHOT.jar into \
/tmp/archived-file-set.93251505.tmp
[INFO] Expanding: .../.m2/repository/.../simple-model-1-SNAPSHOT.jar into \
/tmp/archived-file-set.2012480870.tmp
[INFO] Expanding: .../.m2/repository/../hibernate-3.2.5.ga.jar into \
/tmp/archived-file-set.1296516202.tmp
... skipping 25 lines of dependency unpacking ...
[INFO] Expanding: .../.m2/repository/.../velocity-1.5.jar into \
/tmp/archived-file-set.379482226.tmp
[INFO] Expanding: .../.m2/repository/.../commons-lang-2.1.jar into \
/tmp/archived-file-set.1329200163.tmp
[INFO] Expanding: .../.m2/repository/.../oro-2.0.8.jar into \
/tmp/archived-file-set.1993155327.tmp
[INFO] Building jar: .../simple-parent/simple-command/target/\
simple-command-jar-with-dependencies.jar
빌드는 바이트코드를 컴파일하고, 테스트를 실행하고, 최종적으로 프로젝트에 대한 JAR를 빌드하는 생명주기를 통해 진행된다. 그 다음에 assembly:assembly goal은 임시 디렉토리에 모든 의존관계를 풀어서 의존관계와 같이 JAR 를 생성한 다음에 simple-command-jar-with-dependencies.jar 라는 이름으로 target/에 단일 JAR로 모든 바이트코드를 묶는다. 이렇게 만들어진 JAR는 15MB 정도가 된다.
command-line 도구를 실행하기 전에 HSQLDB DB를 생성하는 Hibernate3 플러그인의 hbm2ddl goal을 호출할 필요가 있다. simple-command 디렉토리의 다음 명령을 실행함으로써 수행한다.
$ mvn hibernate3:hbm2ddl
[INFO] Scanning for projects...
[INFO] Searching repository for plugin with prefix: 'hibernate3'.
[INFO] org.codehaus.mojo: checking for updates from central
[INFO] ------------------------------------------------------------------------
[INFO] Building Chapter 7 Simple Command Line Tool
[INFO] task-segment: [hibernate3:hbm2ddl]
[INFO] ------------------------------------------------------------------------
[INFO] Preparing hibernate3:hbm2ddl
...
10:24:56,151 INFO org.hibernate.tool.hbm2ddl.SchemaExport - export complete
[INFO] ------------------------------------------------------------------------
[INFO] BUILD SUCCESSFUL
[INFO] ------------------------------------------------------------------------
일단 이렇게 실행되면, simple-command 밑에 data/ 디렉토리를 볼 수 있다. 이 data/ 디렉토리는 HSQLDB DB를 포함한다. command-line 날씨 정보를 실행하려면, simple-command 프로젝트 디렉토리에서 다음을 실행한다.
$ java -cp target/simple-command-jar-with-dependencies.jar \
org.sonatype.mavenbook.weather.Main 60202
2321 INFO YahooRetriever - Retrieving Weather Data
2489 INFO YahooParser - Creating XML Reader
2581 INFO YahooParser - Parsing XML Response
2875 INFO WeatherFormatter - Formatting Weather Data
****************************************
Current Weather Conditions for:
Evanston,
IL,
US
****************************************
* Temperature: 75
* Condition: Partly Cloudy
* Humidity: 64
* Wind Chill: 75
* Date: Wed Aug 06 09:35:30 CDT 2008
이력 조회를 실행하려면, 다음의 명령을 실행한다.
$ java -cp target/simple-command-jar-with-dependencies.jar \
org.sonatype.mavenbook.weather.Main 60202 history
2470 INFO WeatherFormatter - Formatting History Data
Weather History for:
Evanston, IL, US
****************************************
* Temperature: 39
* Condition: Heavy Rain
* Humidity: 93
* Wind Chill: 36
* Date: 2007-12-02 13:45:27.187
****************************************
* Temperature: 75
* Condition: Partly Cloudy
* Humidity: 64
* Wind Chill: 75
* Date: 2008-08-06 09:24:11.725
****************************************
* Temperature: 75
* Condition: Partly Cloudy
* Humidity: 64
* Wind Chill: 75
* Date: 2008-08-06 09:27:28.475
7.10. 결론
이곳까지 다다르기 위해서 메이븐과 직접적으로 관련이 없는 내용에 대해 많은 시간을 할해했다. 실세계 시스템을 구현하는데 사용될 수 있는 완전하고 의미있는 예제 프로젝트를 제시함으로써 위와 같이 설명했다. 멋들어지고, 규격화된 결과를 빨리 얻으려고 빠른 길을 선택하지 않았으며, Ruby on Rails 풍의 기술을 사용해서 현혹하고 “쉬운 10분!”에 완성된 자바 엔터프라이즈 어플리케이션을 만들수 있다는 믿음을 부여하지 않았다. 시장에는 이러한 내용들이 많이 있다. 시간이나 노력을 거의 투자하지 않는 가장 쉬운 프레임워크를 판매하려는 사람들이 많이 있다. 이 장에서 하려고 했던 것은 전체 그림, 즉 다중 모듈 빌드에 대한 전체 생태계를 제시하는 것이다. 아파치 Ant를 비방하고 아파치 메이븐을 적용하는데 설득하는 빠르고, 10분의 설명을 붙이는 것이 아닌 생생하게 살아있는 것을 보여주는 것과 유사한 어플리케이션의 영역에서 메이븐을 보여주었다.
메이븐과 관련된 내용에 대해 궁금한 것을 이장을 통해 해결되었다면 성공한 것이다. 유명한 프레임워크들을 사용해서 복잡한 프로젝트를 제시했고, 선언적인 빌드를 사용해서 같이 묶었다. 이장의 60% 이상이 Spring과 Hibernate를 설명하는 것으로 채워졌다는 사실은 대부분이 메이븐은 별도로 떨어져 있다는 것이다. 그 자체로 작동했다. 빌드 프로세스가 아니라 어플리케이션 그 자체에 중점을 두도록 했다. 메이븐을 설명하는데 시간을 사용하고, Spring과 Hibernate와 통합된 “빌드를 빌드” 해야만 했던 작업 대신에 이와 같이 만들어진 프로젝트에서 사용된 기술에 대해 거의 오로지 설명했다. 메이븐을 사용하기 시작하고, 배우려는 시간을 가지려면, 진정으로 절차적인 빌드 스크립트를 작성하는데 시간을 보낼 필요가 없다는 사실로부터 이점을 얻기 시작할 것이다. 빌드에 대한 현실적인 부분에 대해 걱정하는데 시간을 보낼 필요가 없다.
이 장에서 소개한 개략적인 프로젝트를 여러분 자신의 기반으로 사용할 수도 있으며, 그렇게 한다면 필요한 만큼 더 복잡한 모듈을 만드는 기회로 삼을 수 있다. 예를 들어, 이 장에서의 프로젝트는 두개의 서로 다른 모델 프로젝트와, 서로 다른 DB에 저장하는 두개의 저장 프로젝트, 몇 개의 웹 어플리케이션, 자바 모바일 어플리케이션을 가지게 된다. 전반적으로 실세계 시스템은 최소한 15개의 서로 관련된 모듈로 구성된다. 요점은 이 장에서 포함될 가장 복잡한 다중 모듈을 보았다는 것이지만, 이 장의 예제는 단지 메이븐에서 가능한 것의 표면만을 살펴보았다는 것을 역시 알아야 한다.
7.10.1. 프로젝트 인터페이싱에 대한 프로그래밍
이 장에서 6장에 나타난 간단한 예제보다 더 복잡한 다중 모듈 프로젝트를 살펴보았지만, 여전히 실세계 프로젝트에 비해 단순하다. 더 큰 프로젝트에서 그림 7-5와 유사한 시스템을 빌드하는 것을 발견할 수도 있다.
예제 7-5. 크고 복잡한 시스템에 대한 예제
반응형
'Homo Faber > Maven Definitive Guide' 카테고리의 다른 글
| Maven에서 Flexmojo 사용하기 (0) | 2009.10.08 |
|---|---|
| 8장. POM 최적화와 리팩토링 (0) | 2009.10.06 |
| 6장. 다중 프로젝트 (0) | 2008.10.30 |
| 5장. 간단한 웹 어플리케이션 (2) | 2008.10.30 |
| 4장. 메이븐 프로젝트를 입맛에 맞게 (2) | 2008.10.30 |
